WHMCS Integration for Centova Cast Resellers.
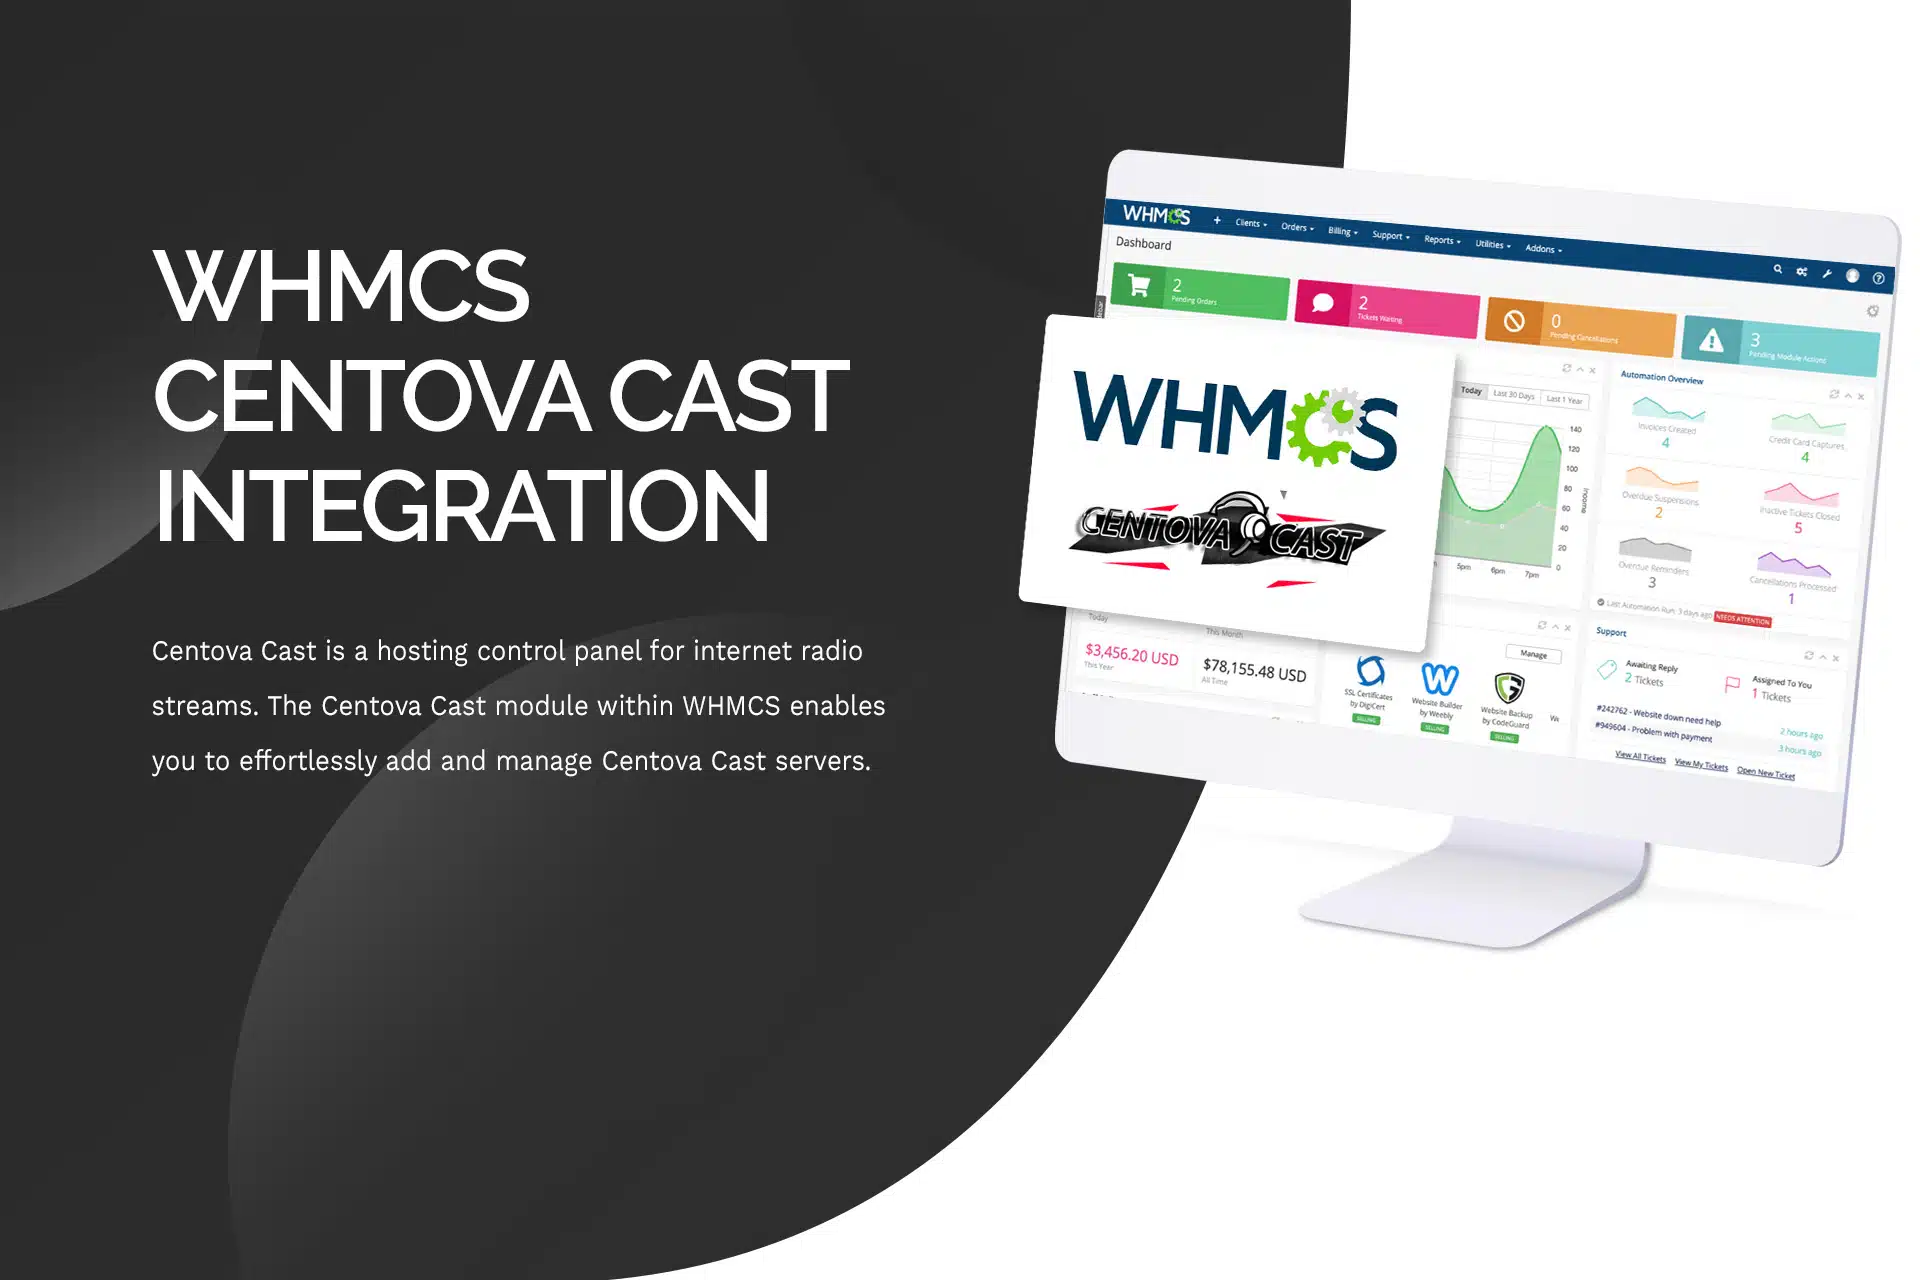
Centova Cast is a leading hosting control panel specifically designed for internet radio streams. Notably, the Centova Cast reseller module within WHMCS enables resellers to efficiently add and manage Centova Cast servers, thereby simplifying operations and enhancing customer service.
Key Features of Centova Cast Integration:
Automated Provisioning:
First and foremost, this integration allows for seamless automated provisioning of Centova Cast servers for resellers. Consequently, when a new customer signs up for a streaming plan, WHMCS can automatically create the server in Centova Cast. This not only eliminates the need for manual setup, but it also reduces errors, leading to improved efficiency for resellers.
Billing Automation:
In addition, WHMCS provides a comprehensive billing system that automates invoicing, payments, and subscription renewals for your Centova services. Thus, by integrating with Centova Cast, you can ensure accurate billing for your customers, which ultimately improves cash flow and operational efficiency for resellers. Moreover, this automation allows you to focus on other critical areas of your business.
Client Management:
Furthermore, the integration centralizes client management for Centova resellers, allowing you to view all client information, including account details, streaming statistics, and payment history. As a result, this unified approach not only enhances customer service but also speeds up issue resolution. Consequently, your clients will have a better overall experience with Centova.
Scalable Solutions:
Additionally, Centova Cast and WHMCS can grow with your business as a reseller. Whether you’re adding new servers or expanding your client base, the integration supports scalability, providing robust solutions for your streaming needs. Therefore, you can adapt quickly to changing market demands and customer requirements.
Detailed Reporting:
Lastly, gain valuable insights into your business performance with detailed reporting features. By tracking revenue, server utilization, and client activity for your Centova services, you can make informed decisions that drive growth. For example, understanding usage patterns can help you optimize your services and maximize profitability.
In summary, the Centova Cast integration with WHMCS offers resellers a powerful tool to enhance their streaming services. With automated processes, effective client management, and scalable solutions, you can not only elevate your internet radio streaming business as a Centova reseller but also focus on growth and profitability. Overall, this integration empowers you to deliver exceptional service to your clients while efficiently managing your operations.
WHMCS Integration:
Setting Up WHMCS for Centova Cast involves a series of steps:
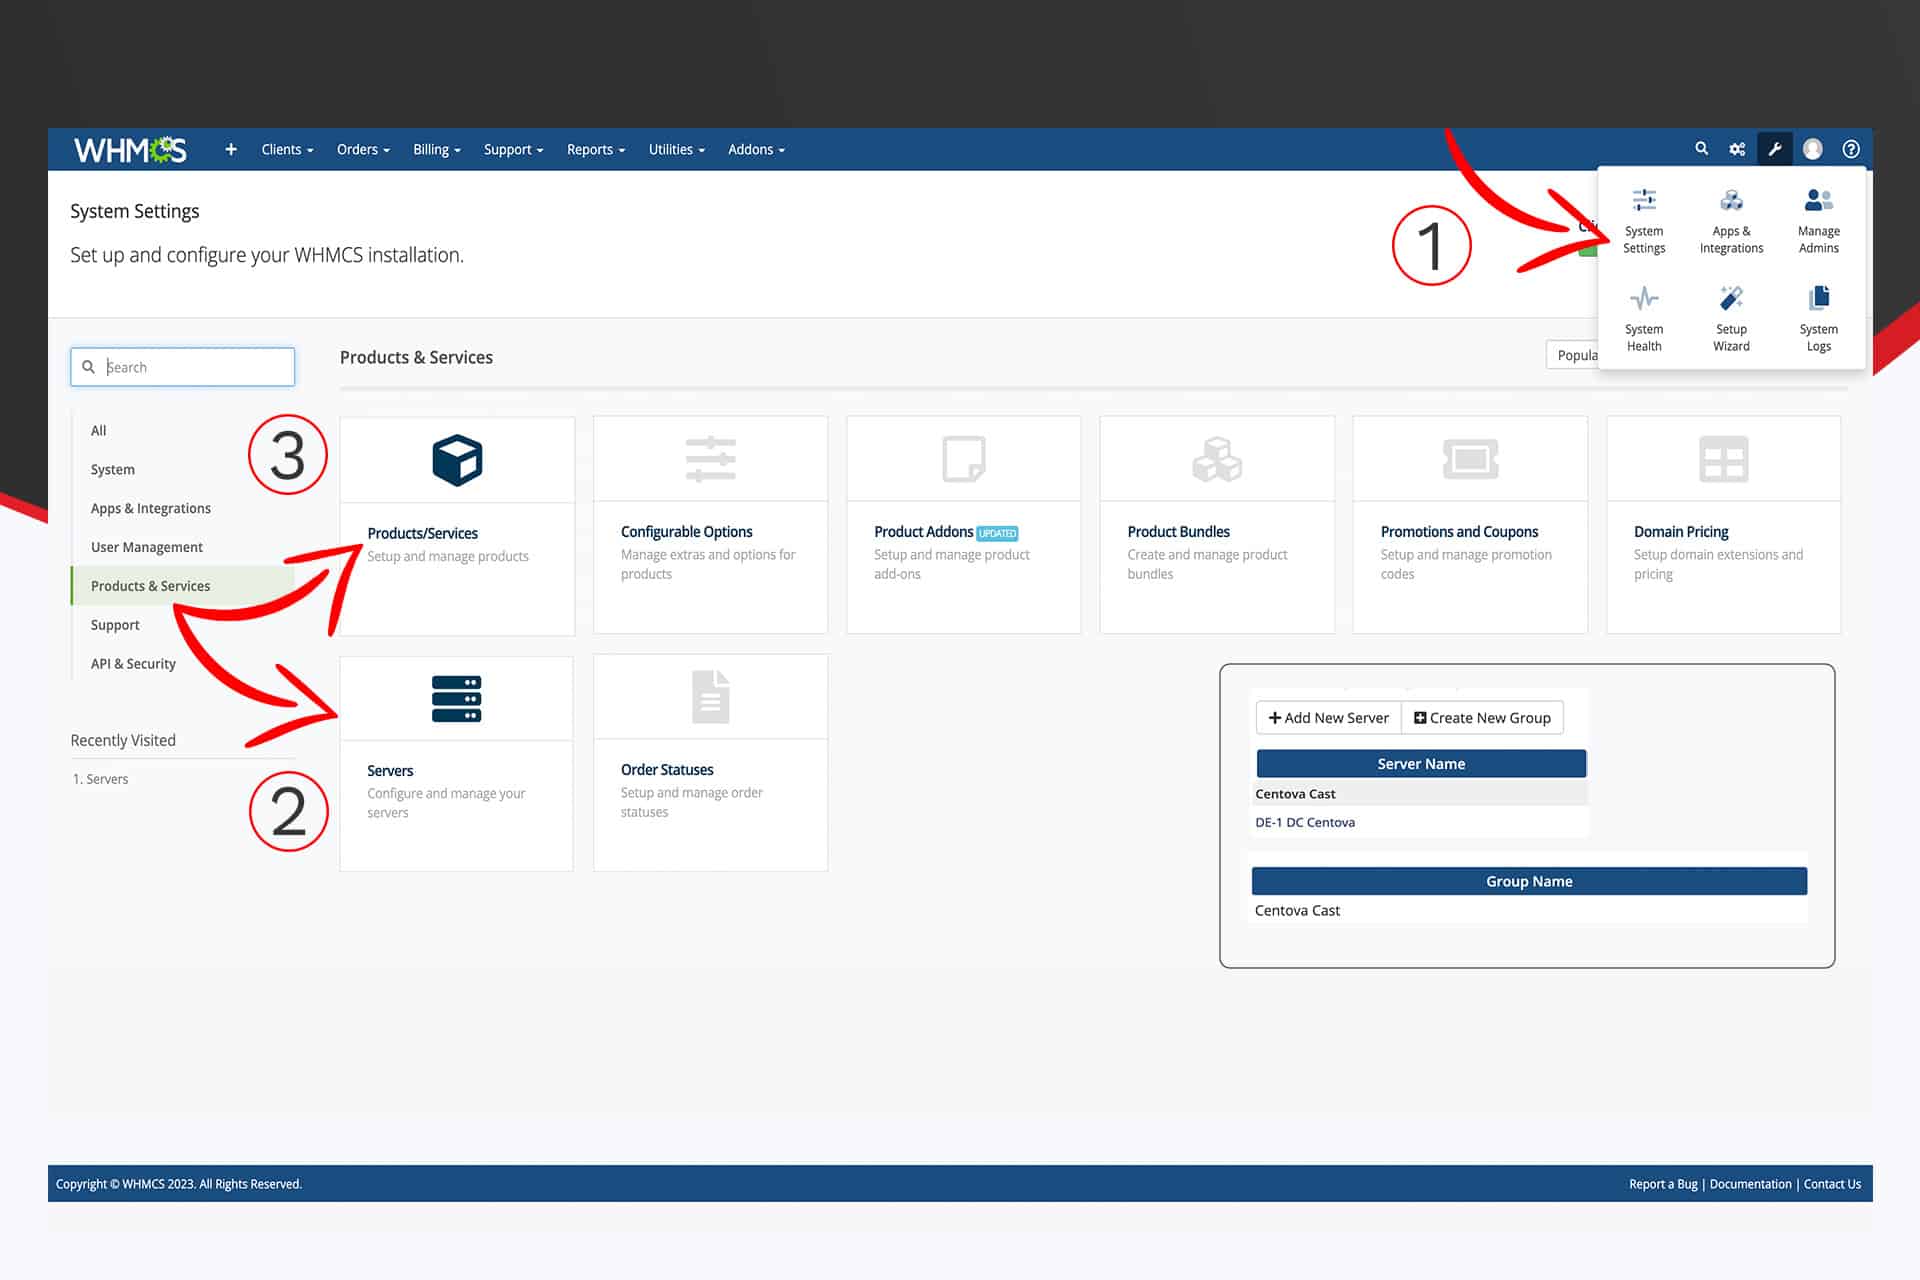
- Step 1:
Begin by logging into WHMCS and navigating to Setup > Products/Services > Servers.- Step 2:
Create a new server group by selecting "Create New Group."- Step 3:
In the "Name" field of the "Create New Group" page, enter "Centova Cast," then save the changes.- Step 4:
Return to the "Servers" page and click "Add New Server."- Step 5:
Complete the required fields on the "Add New Server" page:- Module:
From the drop-down menu, select Centova Cast, then click on the Advanced Button."- Add Server Name:
Provide the name where Centova Cast operates. "Example DC1 Centova Cast."- Hostname:
Enter the complete URL to your Centova Cast installation, like http://dc1.your-reseller-domain.com:2199.- IP Address:
Set this to the machine's IP address where your reseller Centova Cast runs.- Server Details Type:
Choose Centovacast from the dropdown list.- Username:
Centova Cast reseller account, input the reseller account's username.- Password:
use the respective reseller account's password.- Secure:
Keep this checkbox Checked to use SSL Mode for Connections.- Port:
Type in "2199" and check the checkbox to override with a custom port.
All other fields can be ignored. When finished, click Save Changes.
"Please refer to the screenshot below for your reference:"
Click to zoom in on the image
Configure Stream:
To begin, configure a stream hosting product available for purchase by your clients. Follow these steps:
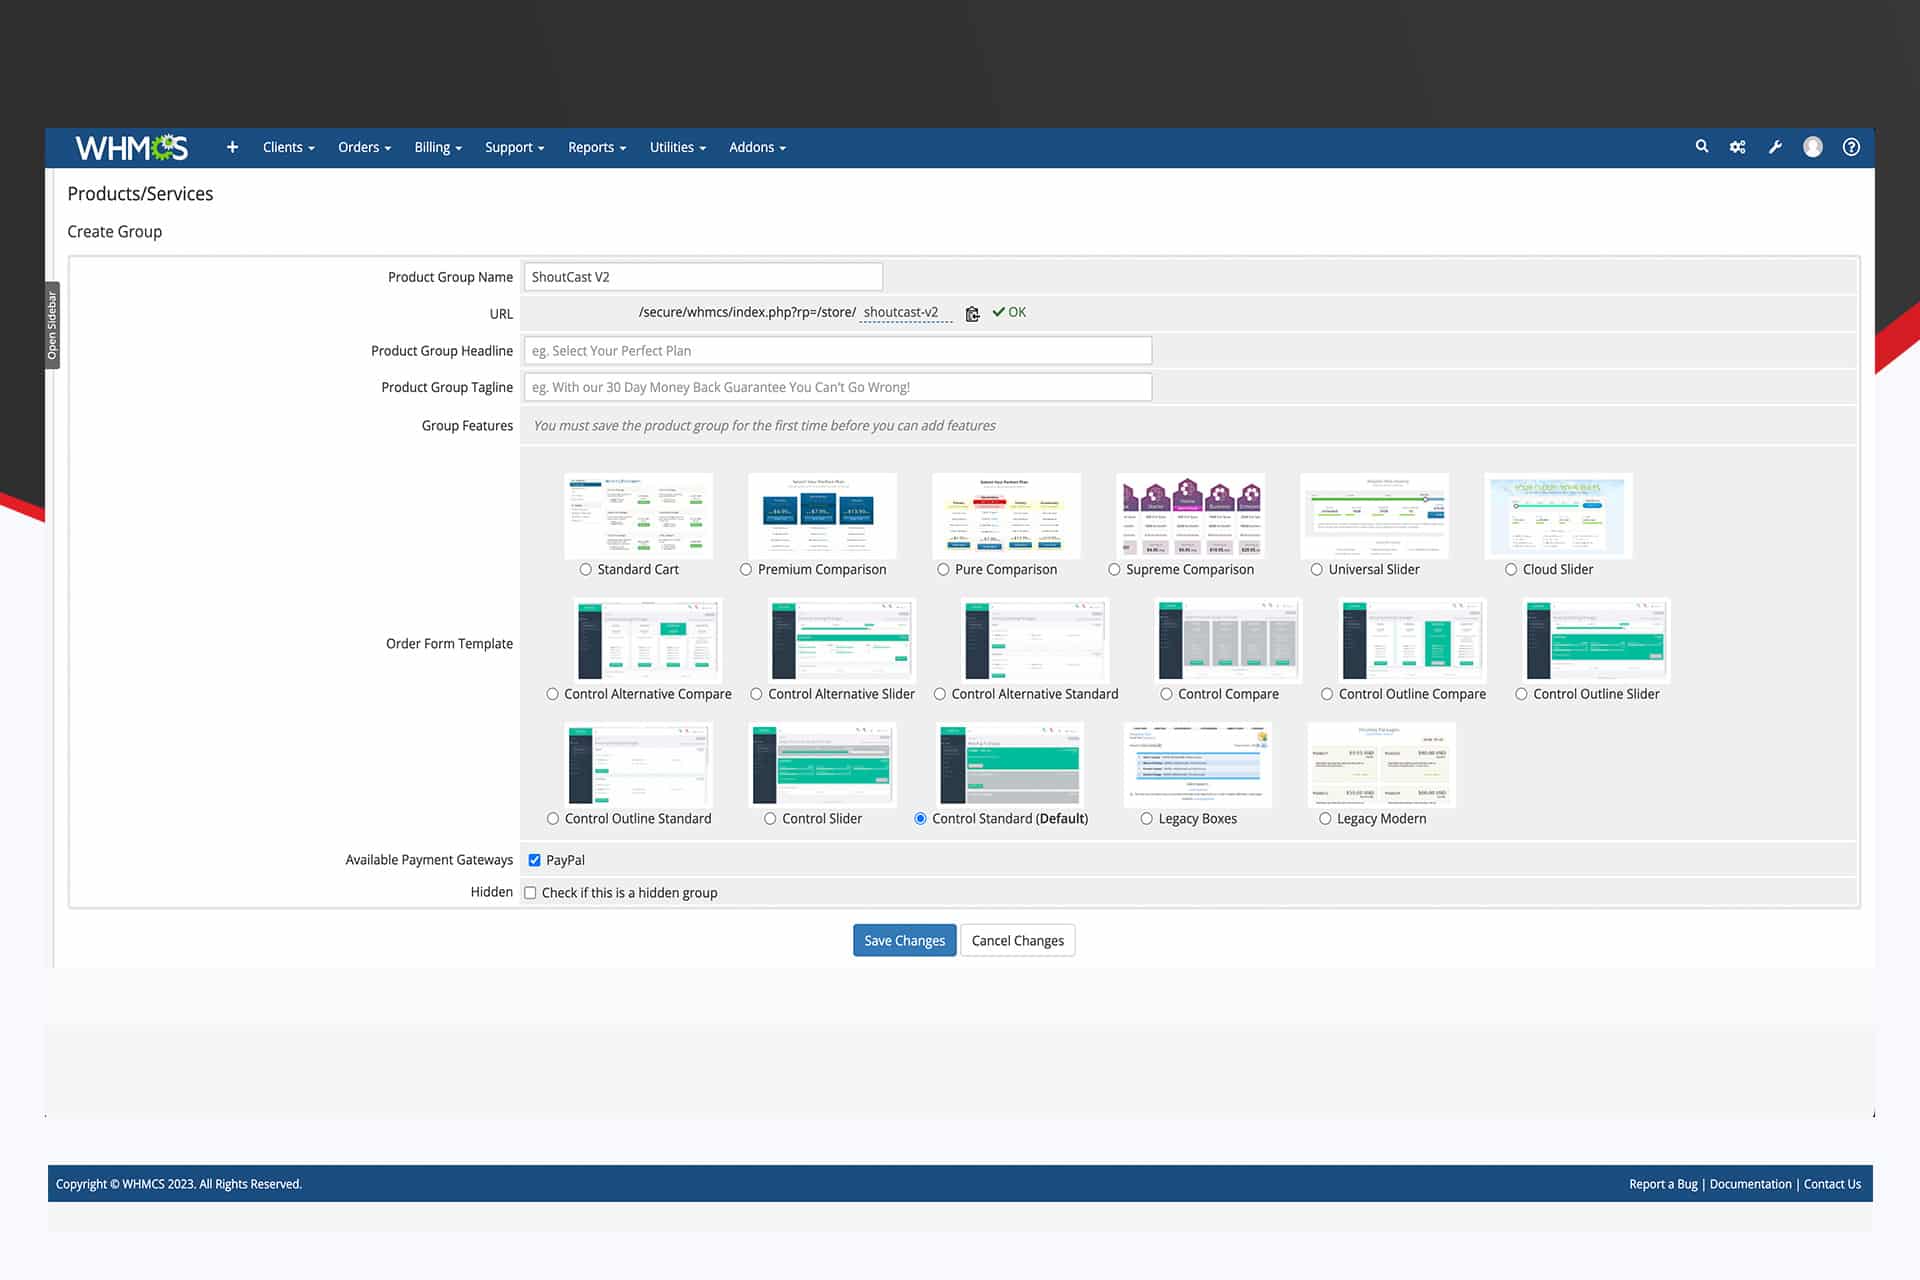
- Step 1:
Go to Setup > Products/Services > Products/Services.- Step 2:
Select "Create a New Group."- Step 3:
Enter "EX: ShoutCast or Icecast " in the Product Group Name field and proceed to create the group.- Step 4:
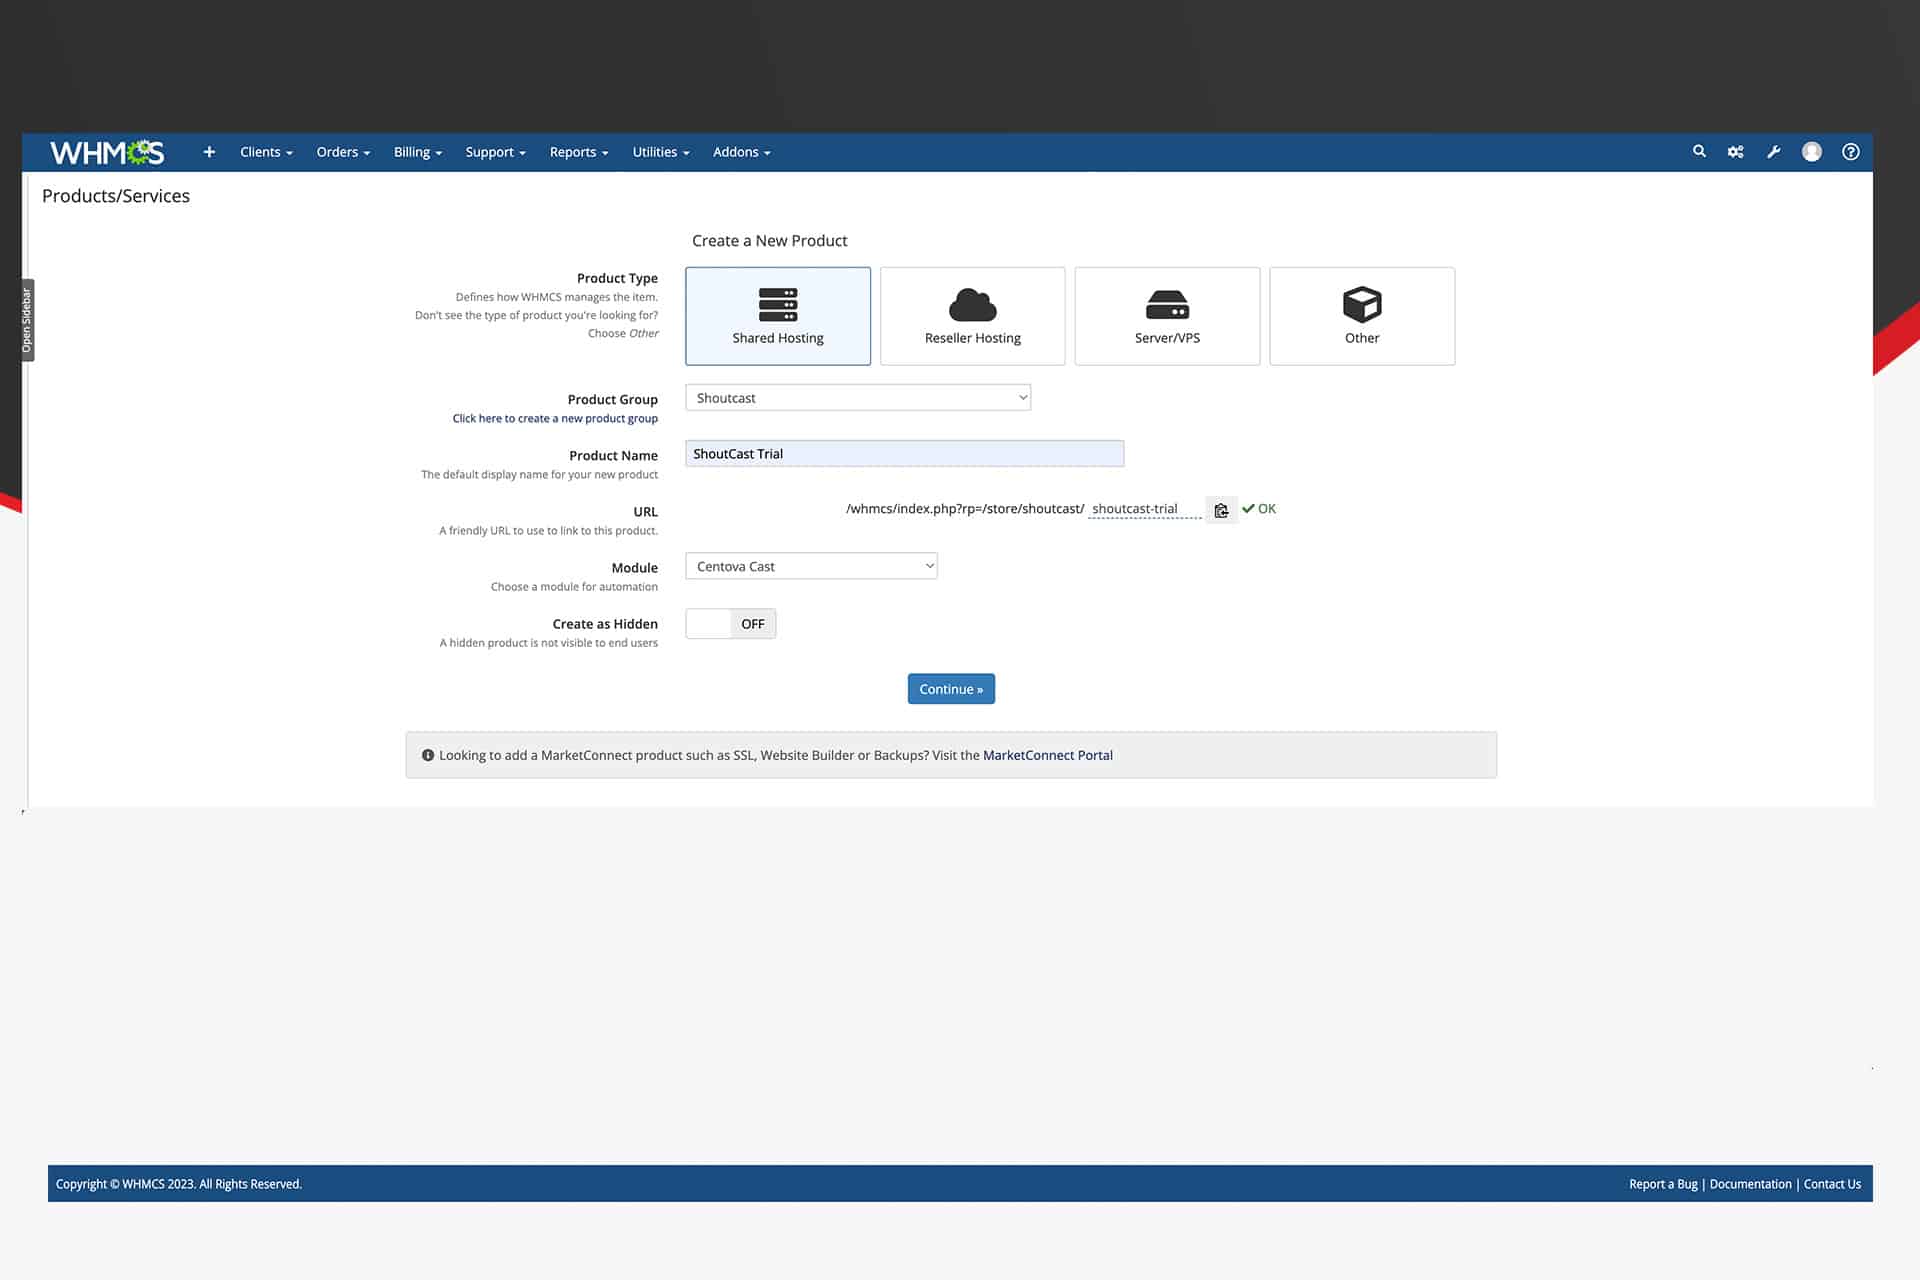
Navigate back to the "Products/Services" page and click on "Create a New Product."- Step 5:
In the "Add New Product" page, provide details in the following fields:- Product Type: Opt for Hosting Account.
- Product Group: Choose The ShoutCast or Icecast.
- Product Name: Insert a descriptive name, like "ShoutCast or Icecast stream hosting package."
- Product Description: eg: your product information.
- Welcome Email: Select the welcome email to dispatch to the customer after the server setup is complete.
- Step 6:
Once done, save the changes.
"Please refer to the screenshot below for your reference:"
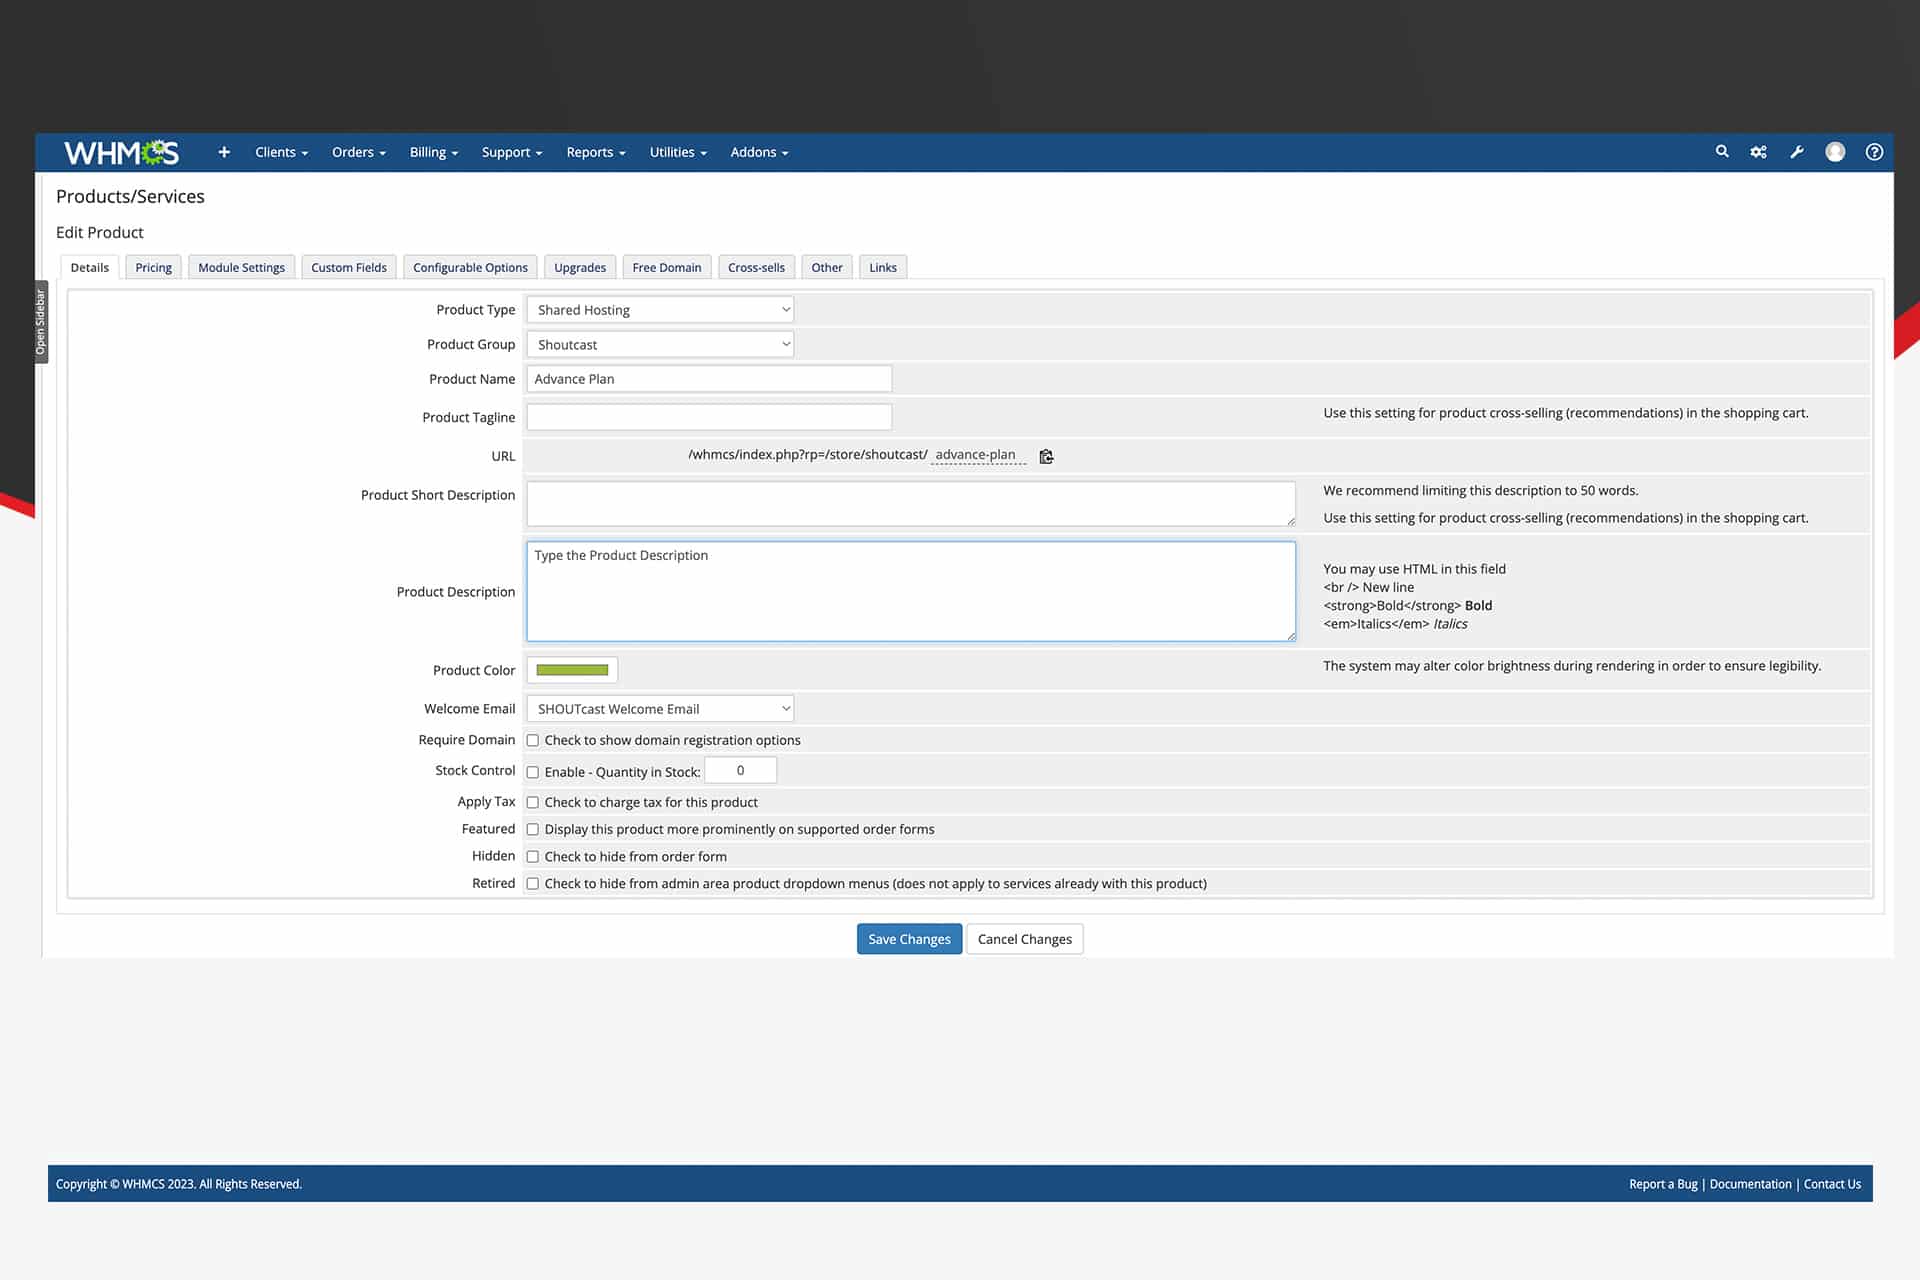
Configure Product:
The product requires additional configuration to seamlessly integrate with Centova Cast and unlock all its available functionalities. Follow these steps corresponding to the various tabs within WHMCS.
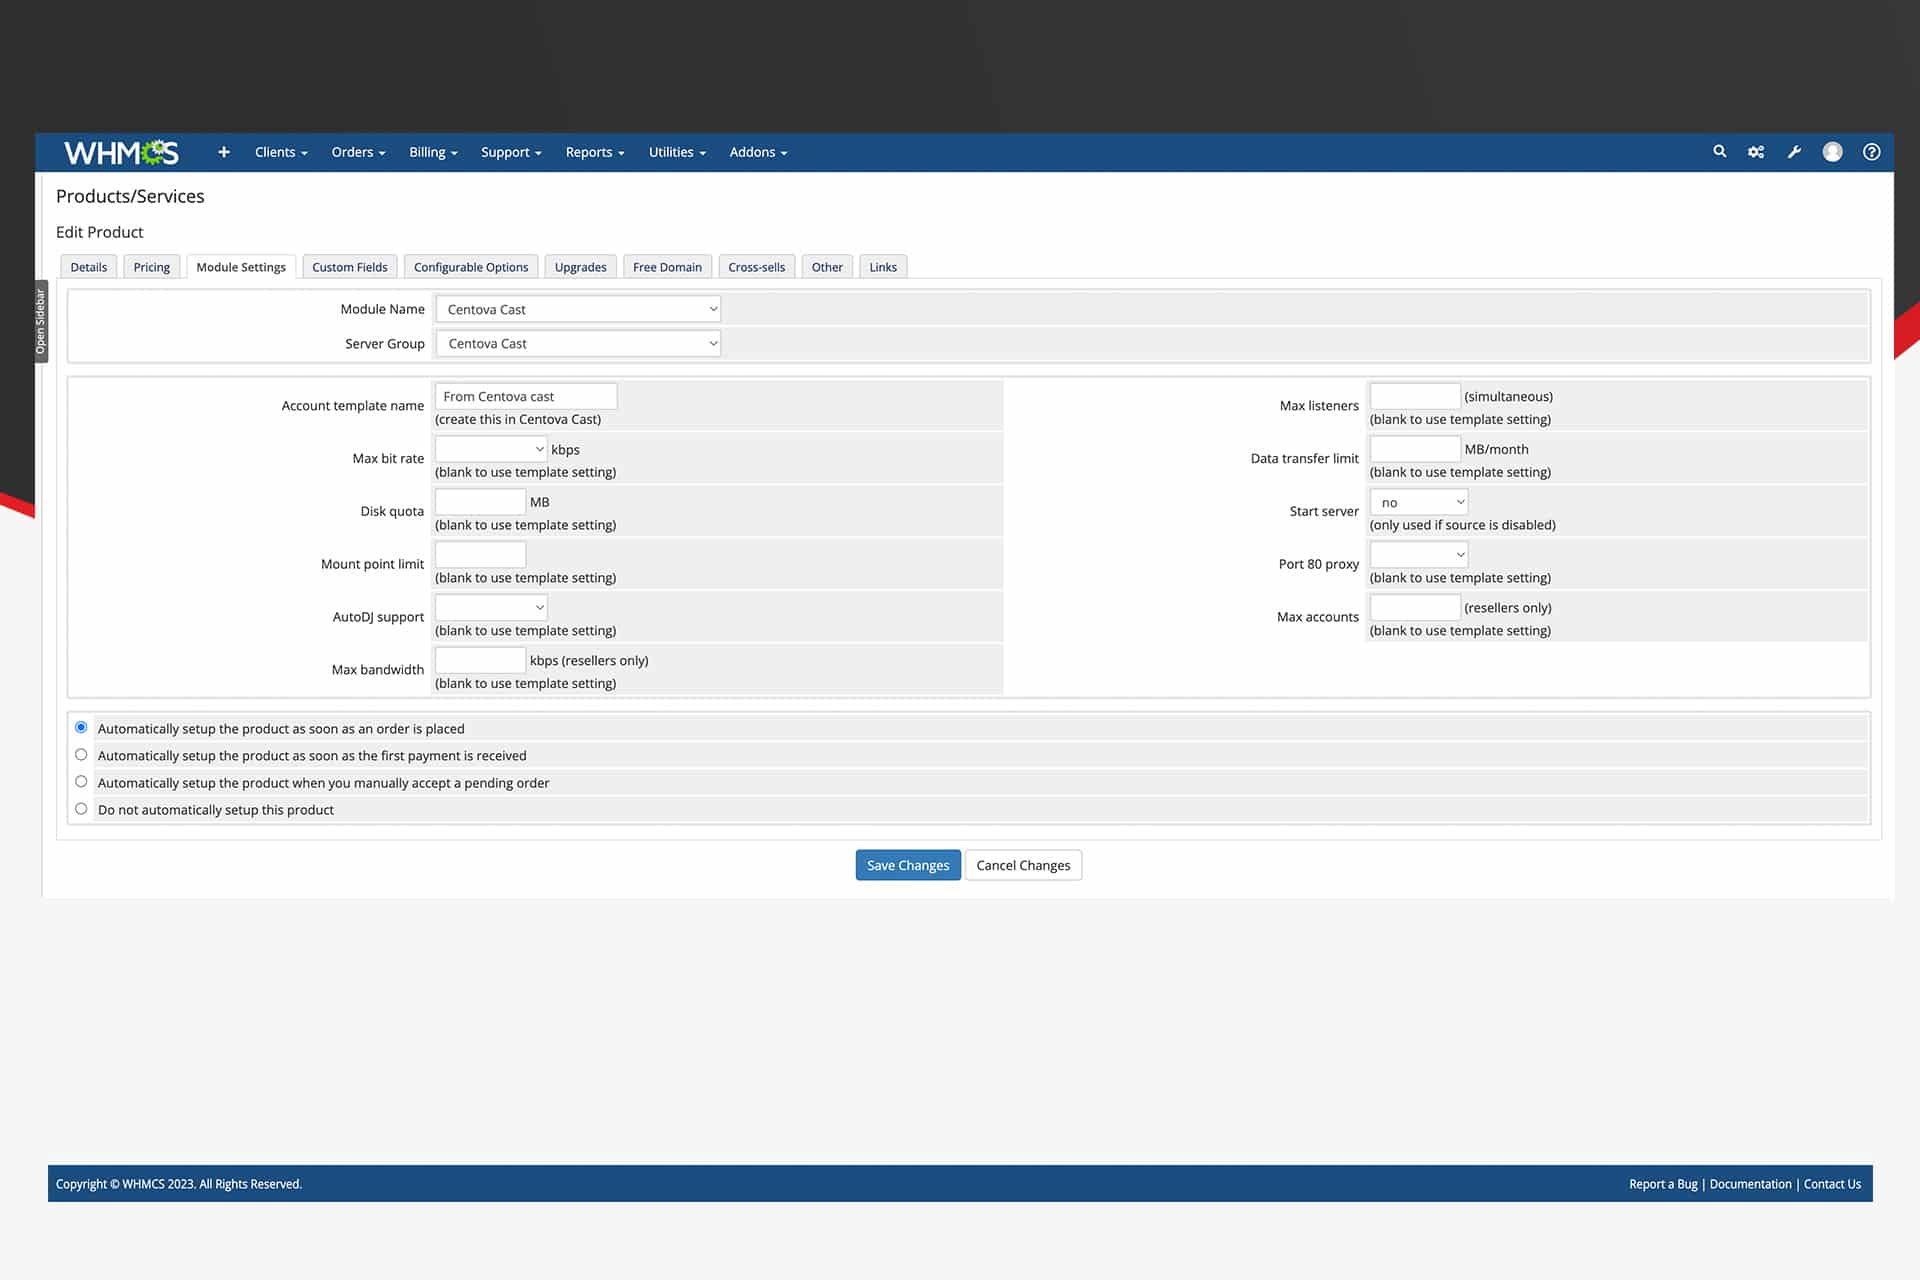
Under the Module Settings tab, complete the following fields:
- Module Name:
Set this to Centovacast. Changing this field reveals the remaining options outlined below.- Server Group:
Assign this to Centova Cast (or the name chosen for the server group created in step 3).- Account Template Name:
Input the name of the Centova Cast account template to utilize for this package. You can create account templates in Centova Cast by logging in as a reseller and navigating to Management > Templates. This feature allows you to predefine entirely custom configurations for each package.For all other fields, you can leave them blank to use the template settings you've created in the Centova Cast Panel, or provide information in these fields if the Centova Cast template isn't visible.
Fields like Max Bit Rate, Disk Quota, Mount Point Limit, AutoDJ Support, Max Bandwidth, Max Listeners, Data Transfer Limit, Start Server, and Max Accounts of your reseller plan should be managed accordingly.
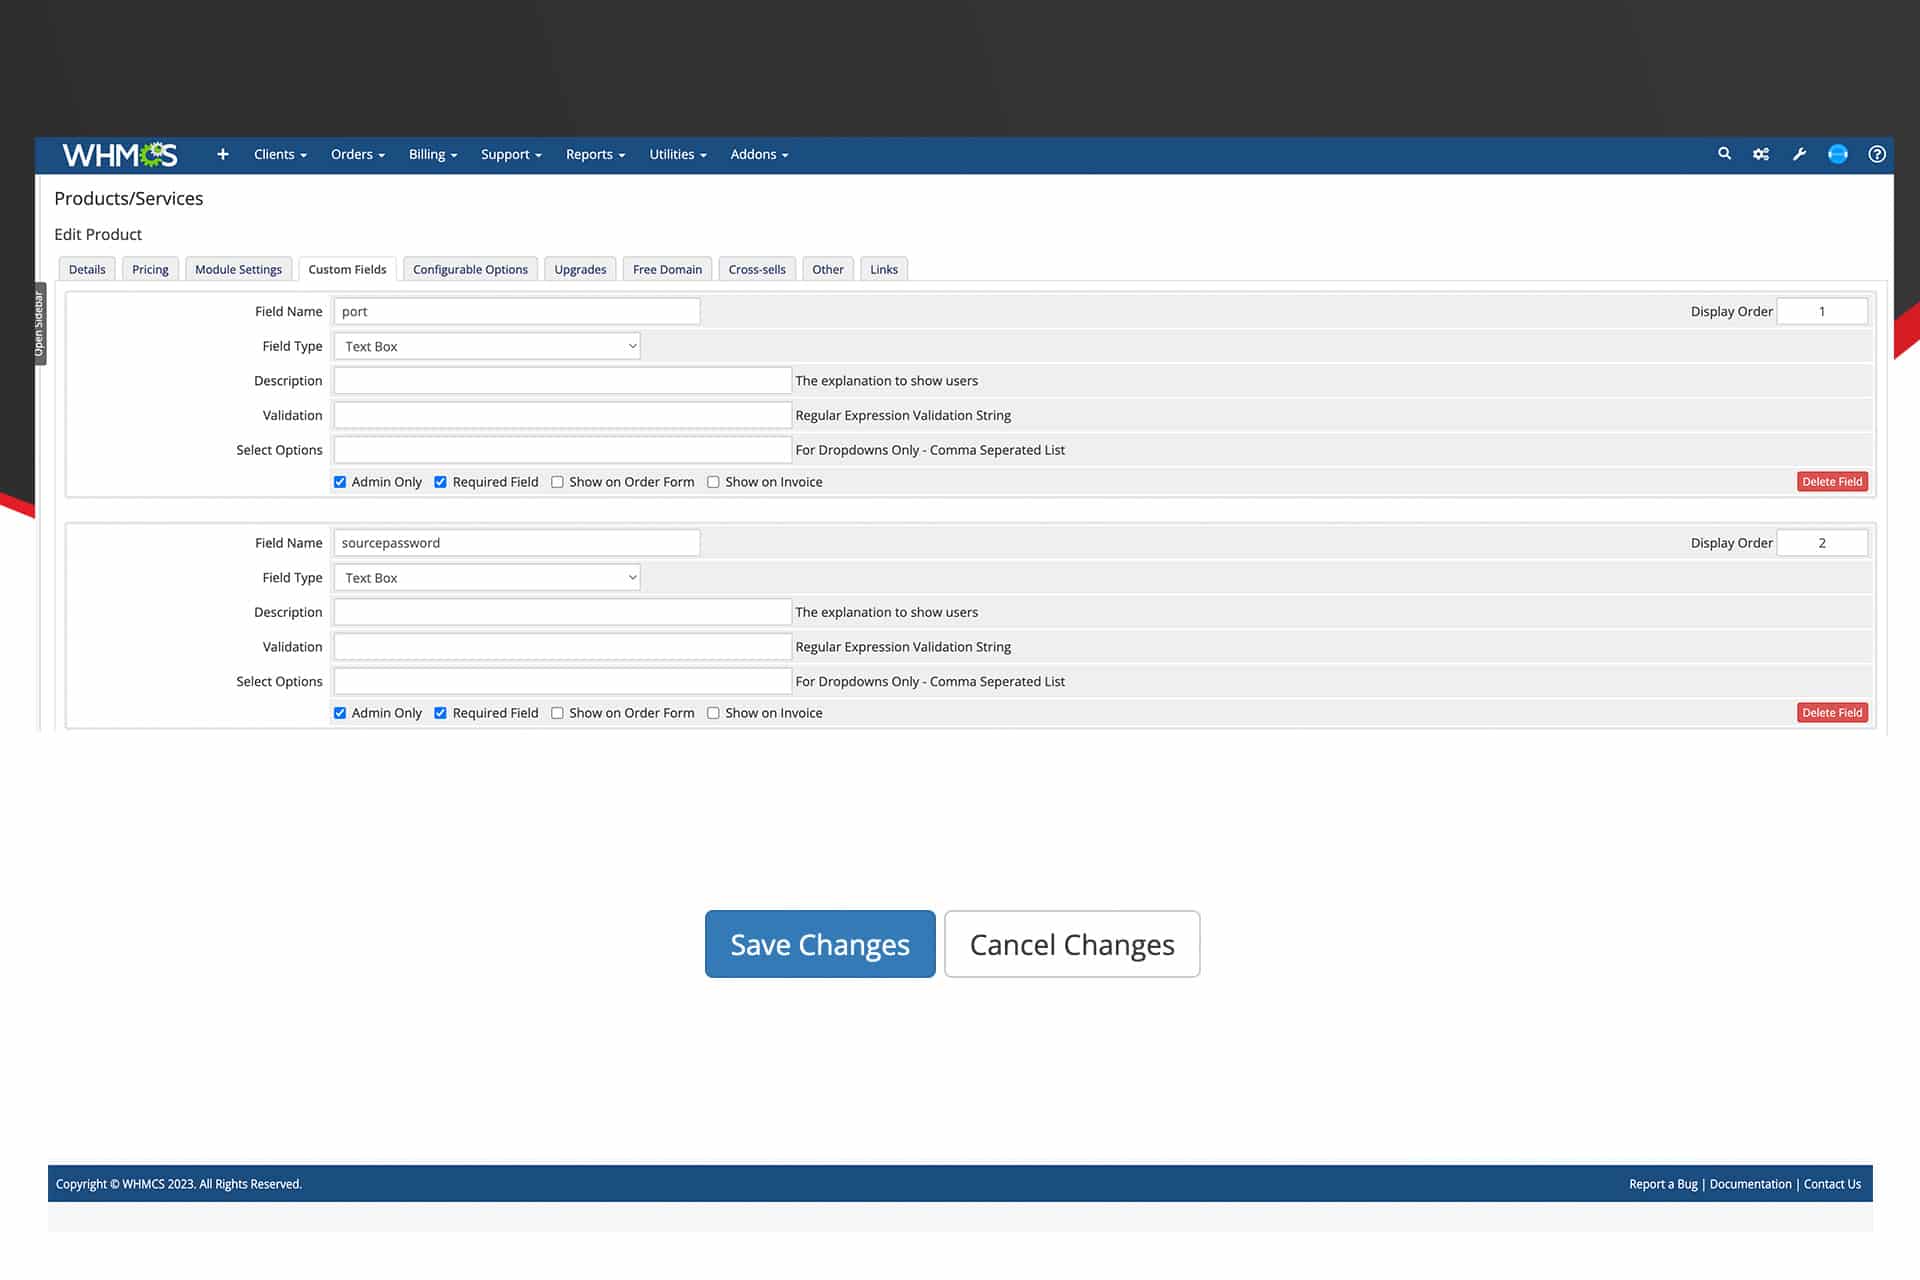
Under the Custom Fields tab, create two Field Box follow these instructions to add new custom fields:
Field 1:
- Field Name: port
- Field Type: Text Box
- Check the Admin and Required Field Only boxes.
Field 2:- Field Name: sourcepassword
- Field Type: Text Box
- Check the Admin and Required Field Only boxes.
Failing to set these fields may prompt the client to fill them out on the order form, treating them as configurable options. Maintain the default settings for other options.
To access the source code for your WHMCS Centova Cast Product's Welcome Email, you can download it through our Client Zone. Head to Service > My Services > "Download Page".
"Please refer to the screenshot below for your reference:"
Centova Cast Module
The Centova Cast module seamlessly integrates into WHMCS, empowering users to effortlessly incorporate and oversee Centova Cast servers within the platform. This module offers comprehensive management functionalities for Centova Cast servers directly within the WHMCS environment.
Supported Features
The Centova Cast module provides the capability to include and administer Centova Cast servers within WHMCS.
- Create, Suspend.
- Unsuspend, Terminate.
- Change Password, Usage Updates.
- Client Area Link.
A Comprehensive Client Guide
Explore our detailed video tutorial for a step-by-step guide on integrating the Centova Cast module with your reseller account. This resource offers comprehensive insights into seamlessly incorporating the module, ensuring you can efficiently manage Centova Cast servers within your reseller account.