MojoCP Reseller WHMCS Integration.
The MojoCP Reseller WHMCS Module integration makes it easier for resellers to manage accounts. Specifically, with WHMCS—a powerful business tool—resellers can simplify billing, payment processing, and account updates. As a result, operational efficiency is significantly boosted, allowing resellers to handle accounts directly within WHMCS for smoother operations.
Simple Account Setup and Management:
Moreover, the MojoCP Reseller WHMCS integration automates account setup. This means that resellers save valuable time by reducing manual tasks. In addition, this setup enables resellers to manage, update, and create accounts all from one platform. Therefore, they can ensure accuracy while simultaneously saving time in account management. Furthermore, this streamlined approach enhances overall productivity.
Automated Billing and Payment Processing:
Additionally, the system makes billing easier by automating invoices and tracking payments. Since WHMCS supports various payment methods, it offers flexibility for both resellers and clients. Consequently, payments are processed smoothly and securely, which greatly enhances the overall user experience. Notably, this feature reduces the risk of errors and improves client satisfaction.
Flexible Solutions for Growing Businesses:
Whether you operate a small or large business, the MojoCP Reseller WHMCS integration offers flexible solutions that can grow with you. Moreover, as demand increases, the integration meets added needs, thus allowing resellers to focus more on boosting customer satisfaction. In this way, they can improve service quality while expanding their business. As a result, they can easily adapt to changing market conditions.
Clear Client Management Tools:
Furthermore, the integration provides helpful tools like account alerts and data management, which assist resellers in offering organized service. Ultimately, this integration empowers resellers to better meet client needs and build strong relationships. Therefore, resellers can ensure that clients receive the support they require, leading to higher retention rates.
Conclusion:
In conclusion, the MojoCP Reseller WHMCS integration is an excellent choice for resellers who want to improve their operational efficiency. By using this tool, businesses can automate key tasks, enhance client management, and grow smoothly. Thus, consider adding this integration to unlock the full potential of your reseller experience. Additionally, you will likely see improved performance and increased profitability.
Download MojoCP Module
Integration WHMCS with MojoCP:
- Start by logging into your MojoCP platform using your username and password.
- From your Dashboard menu, navigate to the “Settings” option under the “General” tab.
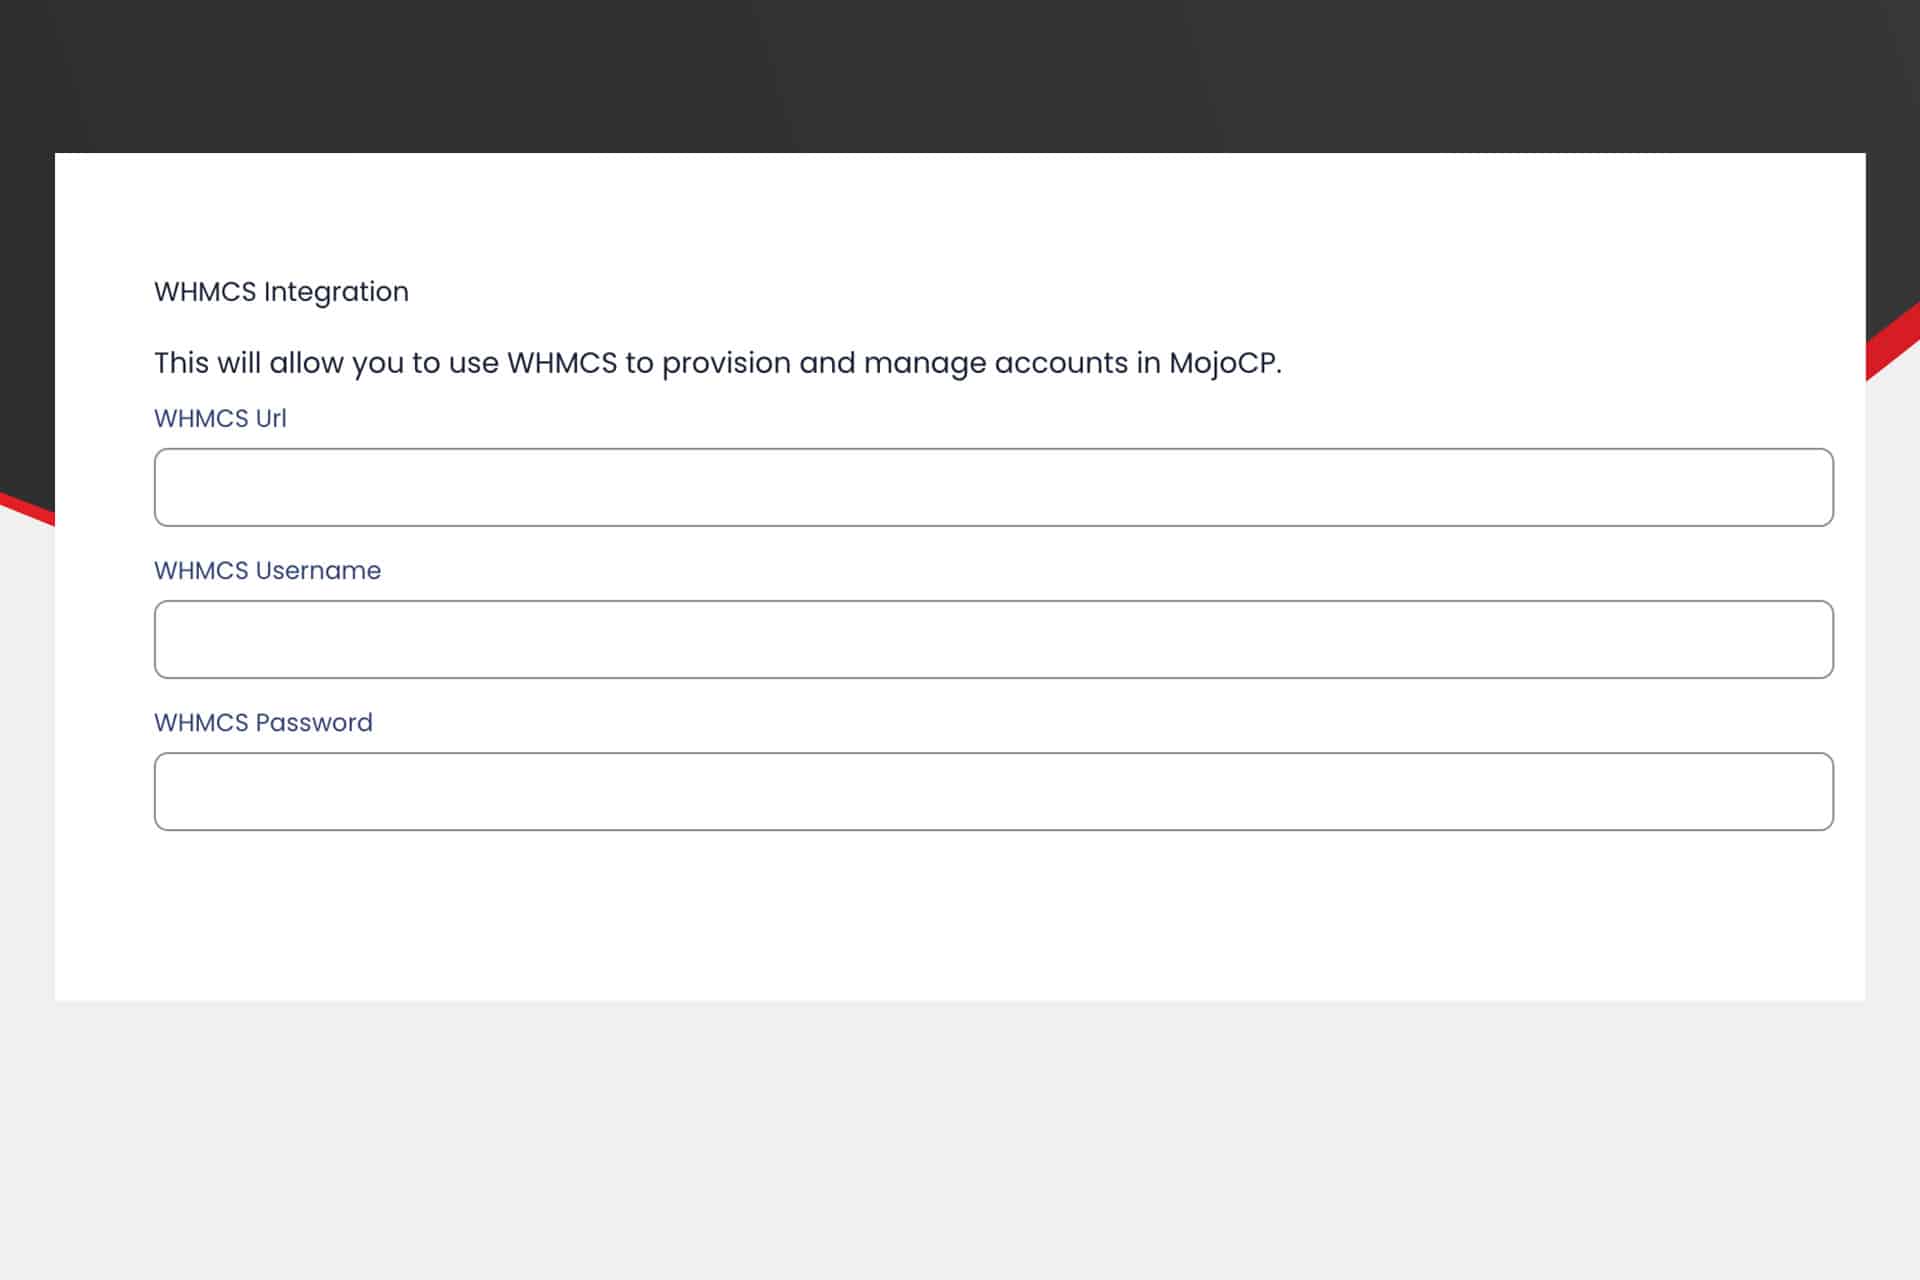
- Once you’re on the “Settings” page, click on the "WHMCS Integration" option.
- In the “WHMCS Integration” section, you will see three fields:
- WHMCS Administrator URL
- WHMCS Username
- WHMCS Password
- Enter the appropriate information for each field, including the URL for your WHMCS admin panel, your WHMCS username, and your WHMCS password.
- After entering all the required information, click on the “Save” button to apply the changes.
Install MojoCP "module"
- Download the MojoCP module you can download it through from our Client Zone.
Head to Service > My Services > "Download Page". and save it to your computer.
The module should come in a zip file format.- To extract the file on a Windows computer, simply double-click the file, select “Extract All,” choose a folder to extract the contents to, and click “Extract.”
On a Mac, you can simply double-click the file to unzip it.- Open your preferred FTP client and log in to your hosting account.
- Navigate to the “whmcs/modules/servers/” folder on your hosting account.
- Once you have located the “whmcs/modules/servers/” folder, upload the “MojoCP” folder from your desktop to the “whmcs/modules/servers/” directory on your hosting account.
- This can be done by dragging and dropping the folder from your desktop to the FTP client window.
Adding a MojoCP Server:
- To set up a MojoCP server in WHMCS:
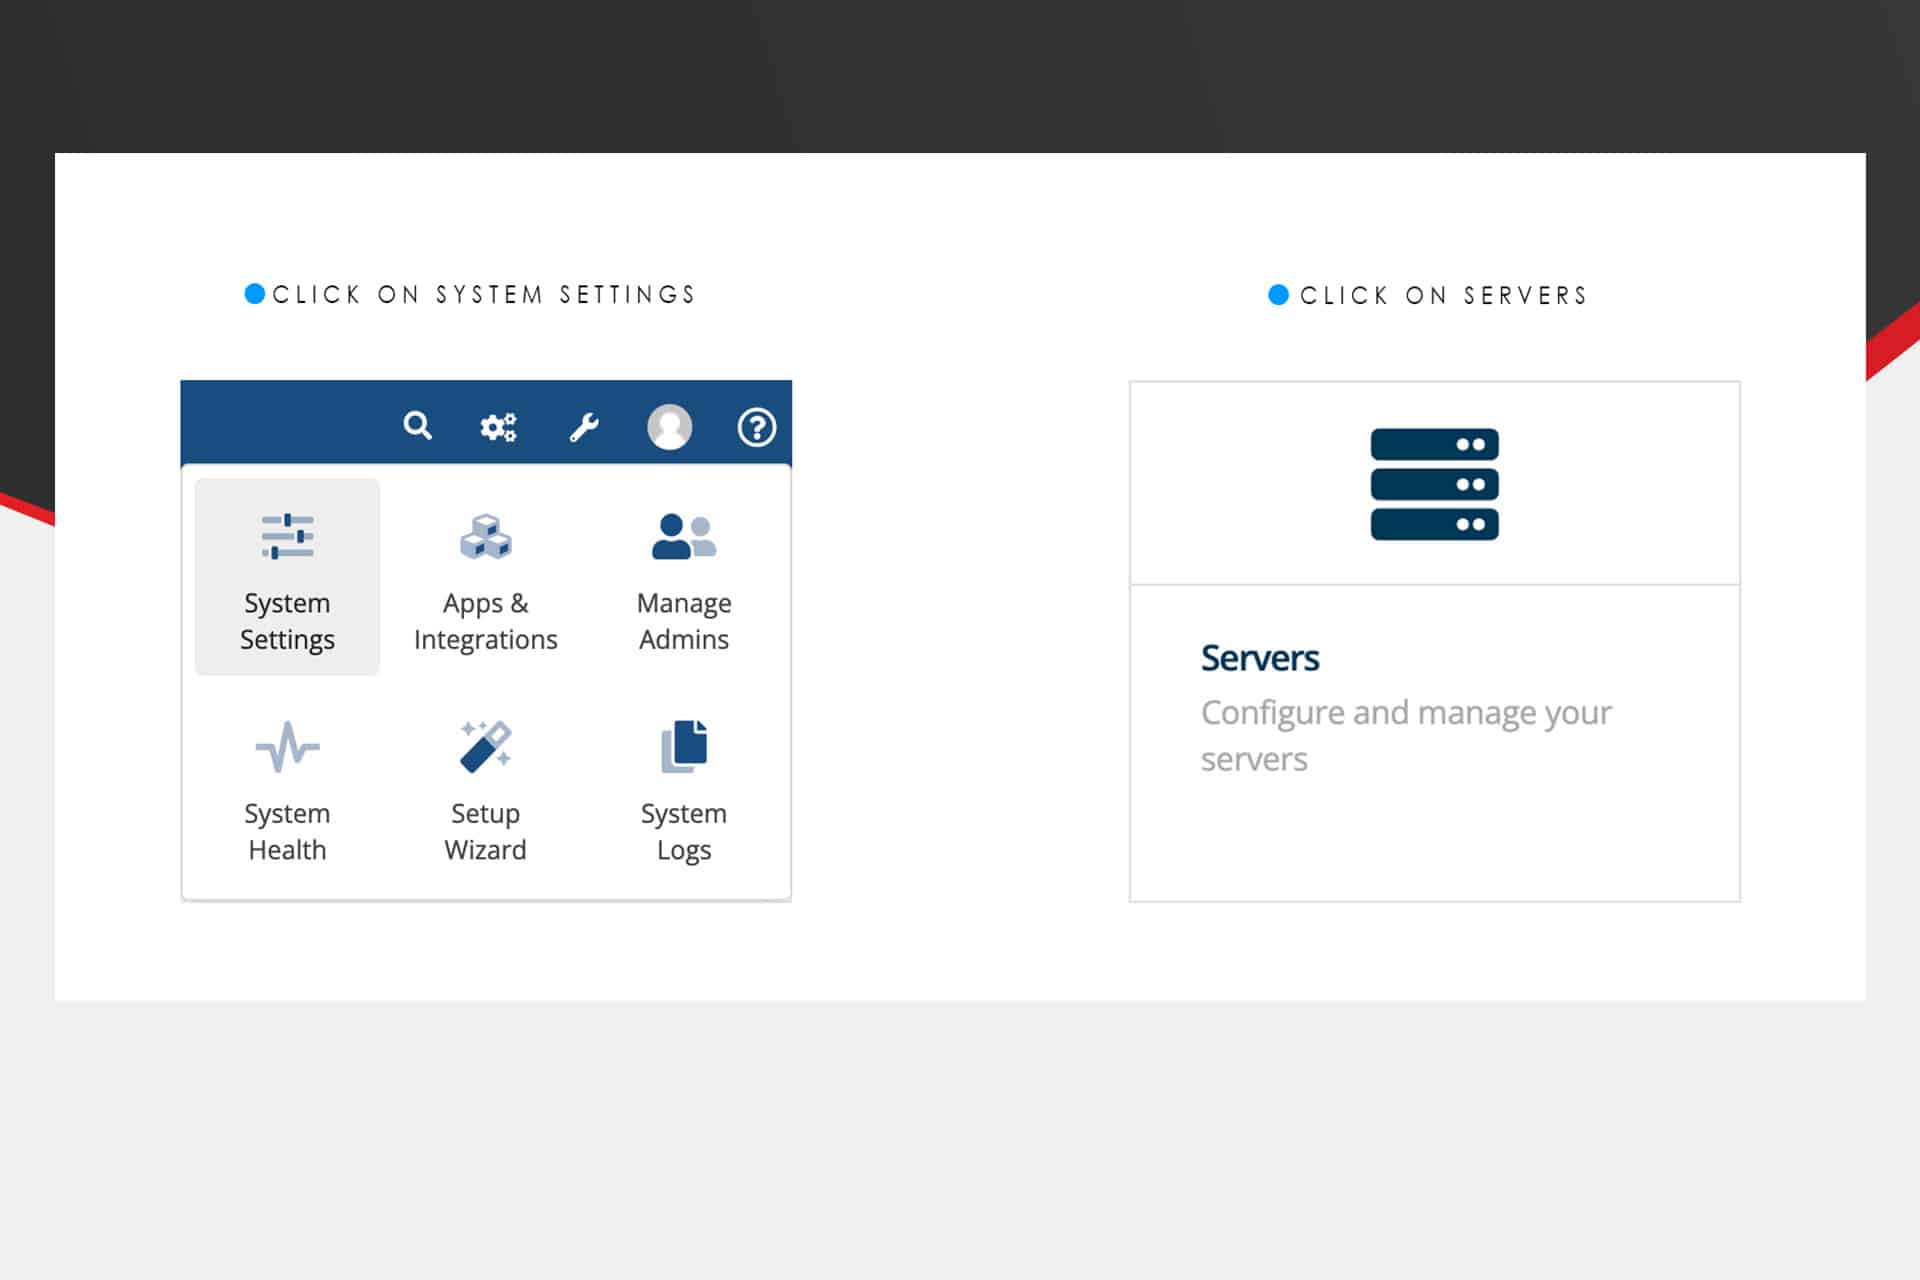
Go to Configuration ()> System Settings > Servers
or, prior to WHMCS 8.x, Setup > Products/Services > Servers."Please refer to the screenshot below for your reference:"
Click to zoom in on the image
Setting Server:
- Click Add New Server.
- Select Mojo Control Panel from the menu.
- Enter the server hostname or IP address. Example (eg. cp.mojocp.com)
- Enter the username and password of your MojoCP login or access hash.
- Click Continue.
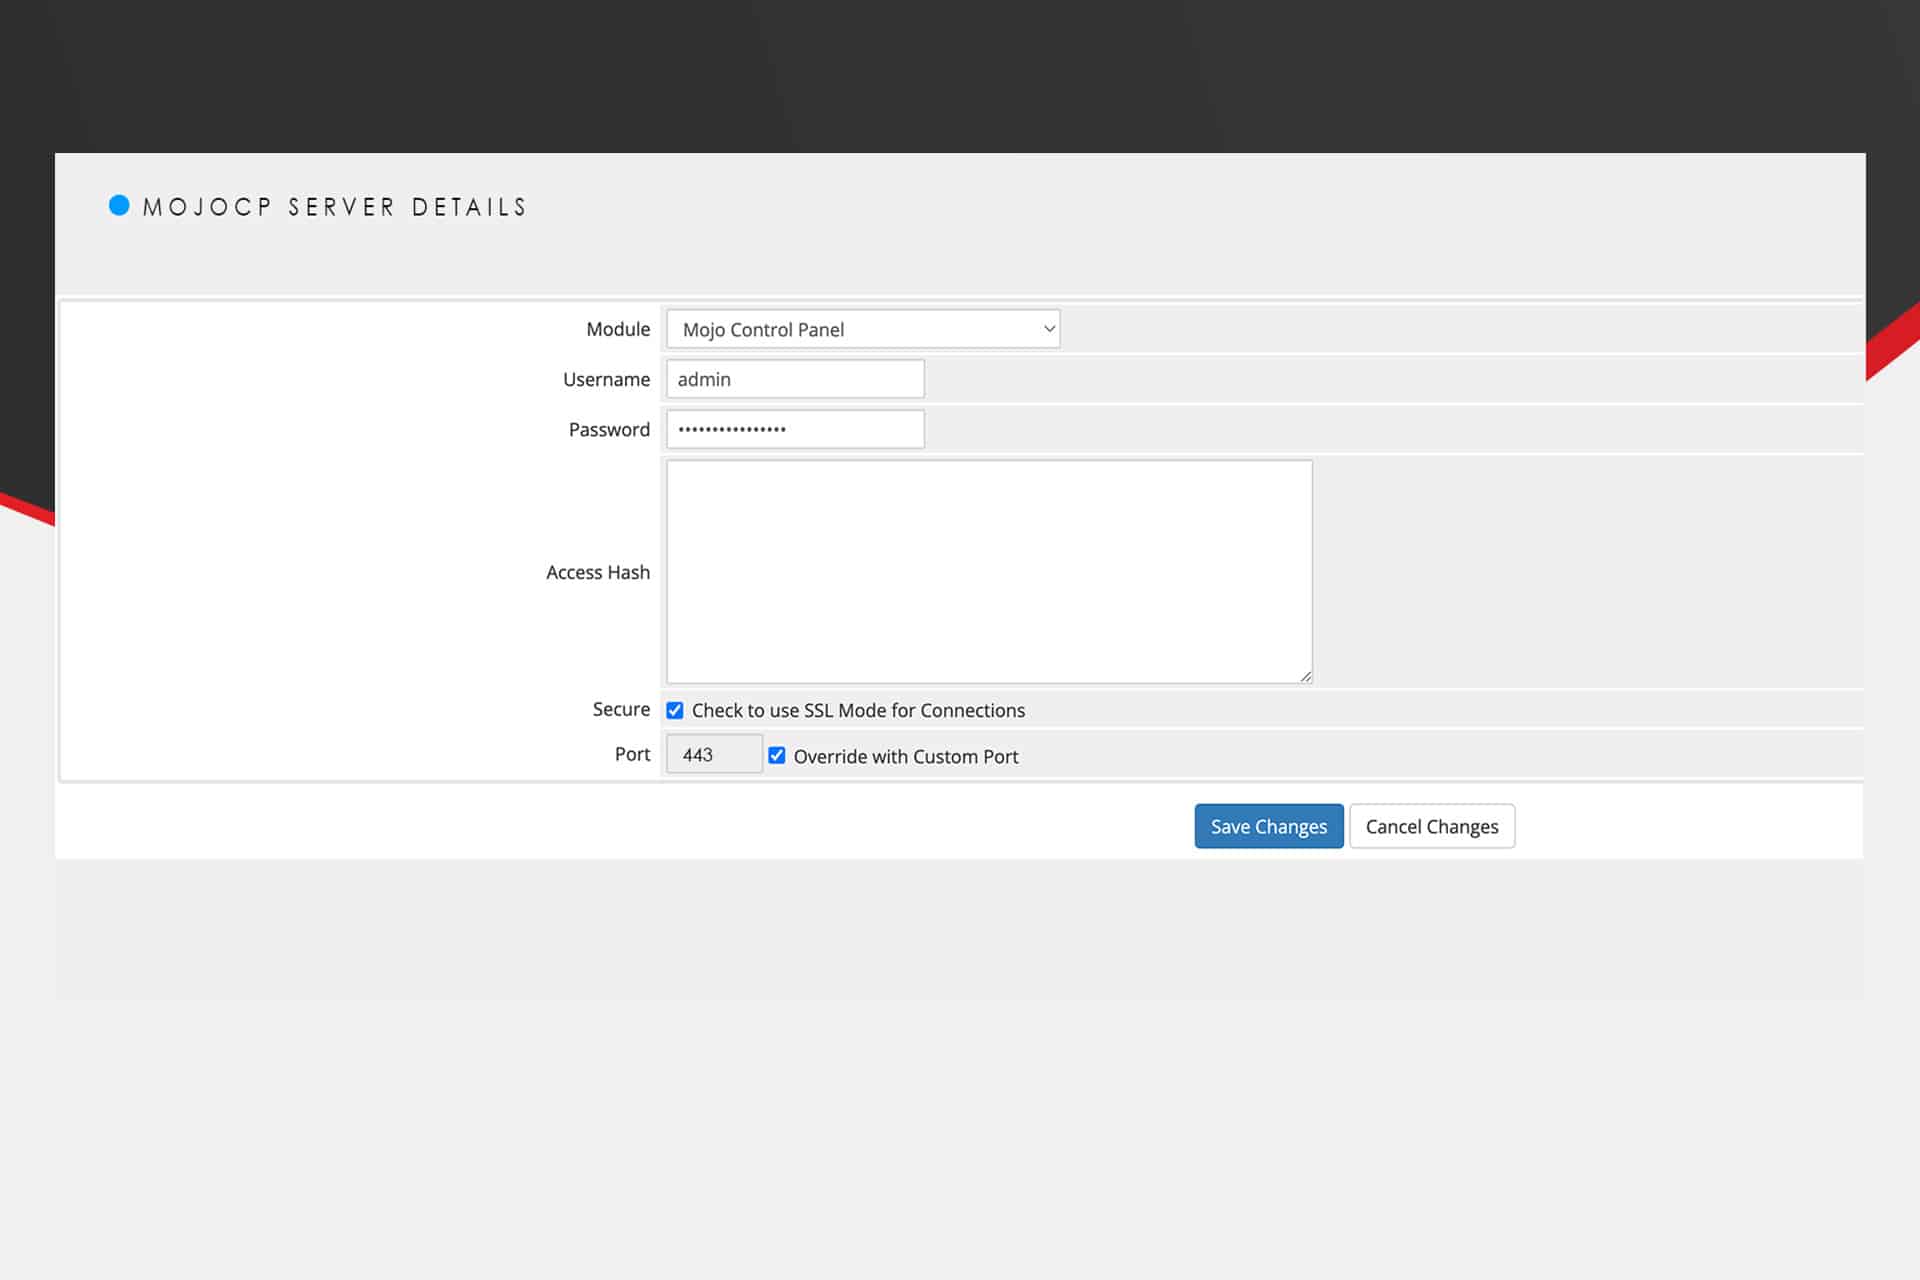
Server Details:
- Enter the remaining desired server details.
- Check to use SSL Mode for Connections and the Override with Custom Port with port “443”
- Click Save Changes.
- If this is the only MojoCP server that is currently in WHMCS, click on the name and ensure that it results in an asterisk (*) next to it.This indicates that it is the default to use when any other non-specific configuration doesn’t apply.
"Please refer to the screenshot below for your reference:"
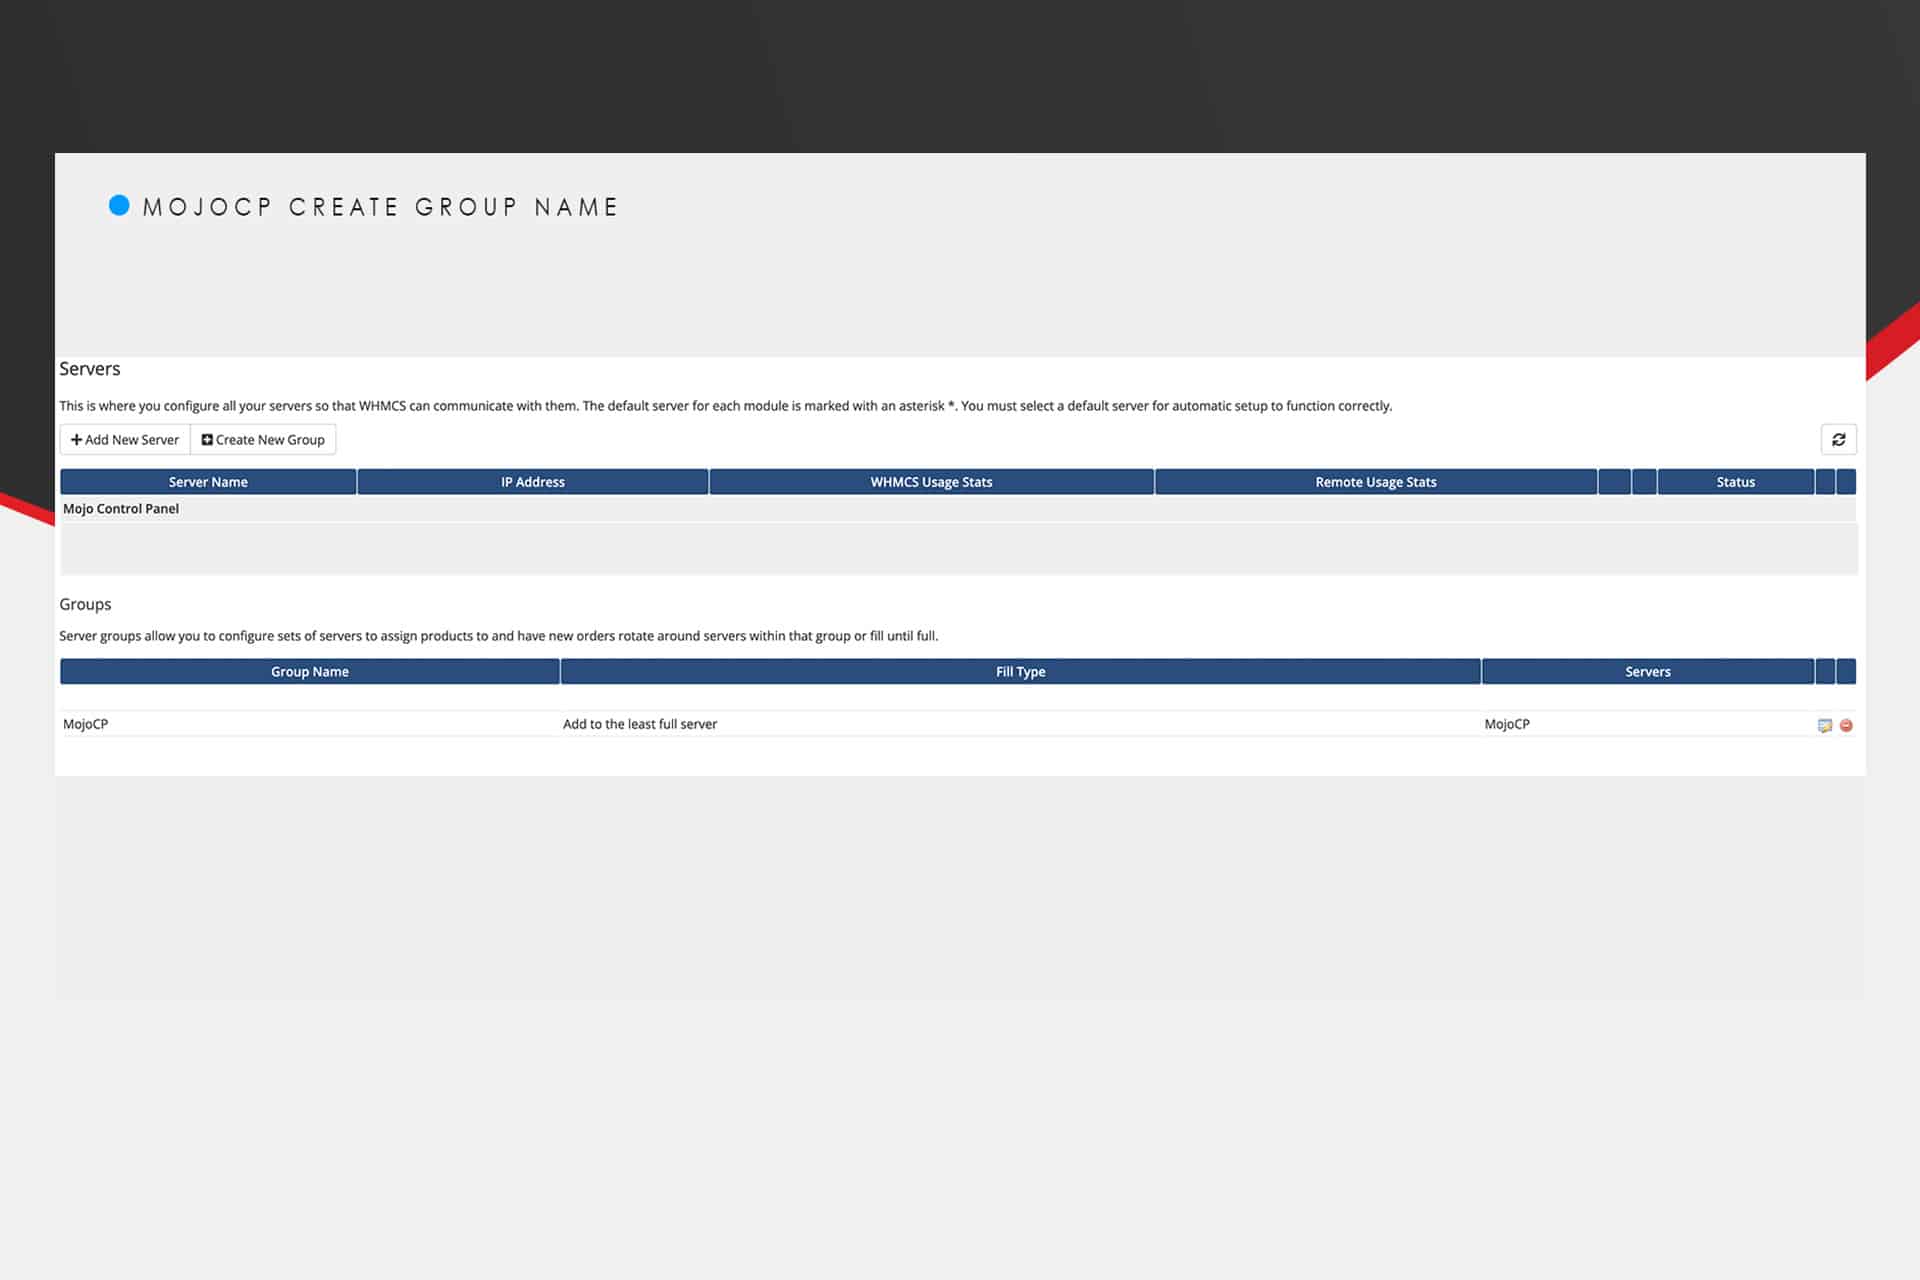

Create a Group Name:
Go to Configuration () > System Settings > Servers or, prior to WHMCS 8.0, Setup > Products/Services > Servers.
Following product group information.
- Click Create New Group.
- Specify the Group Name.
- Select the Fill Type. (Add to the least full server or Fill active server until full then switch to next least used.)
- Selected Servers. name and click add.
- Click Save Changes.
"Please refer to the screenshot below for your reference:"

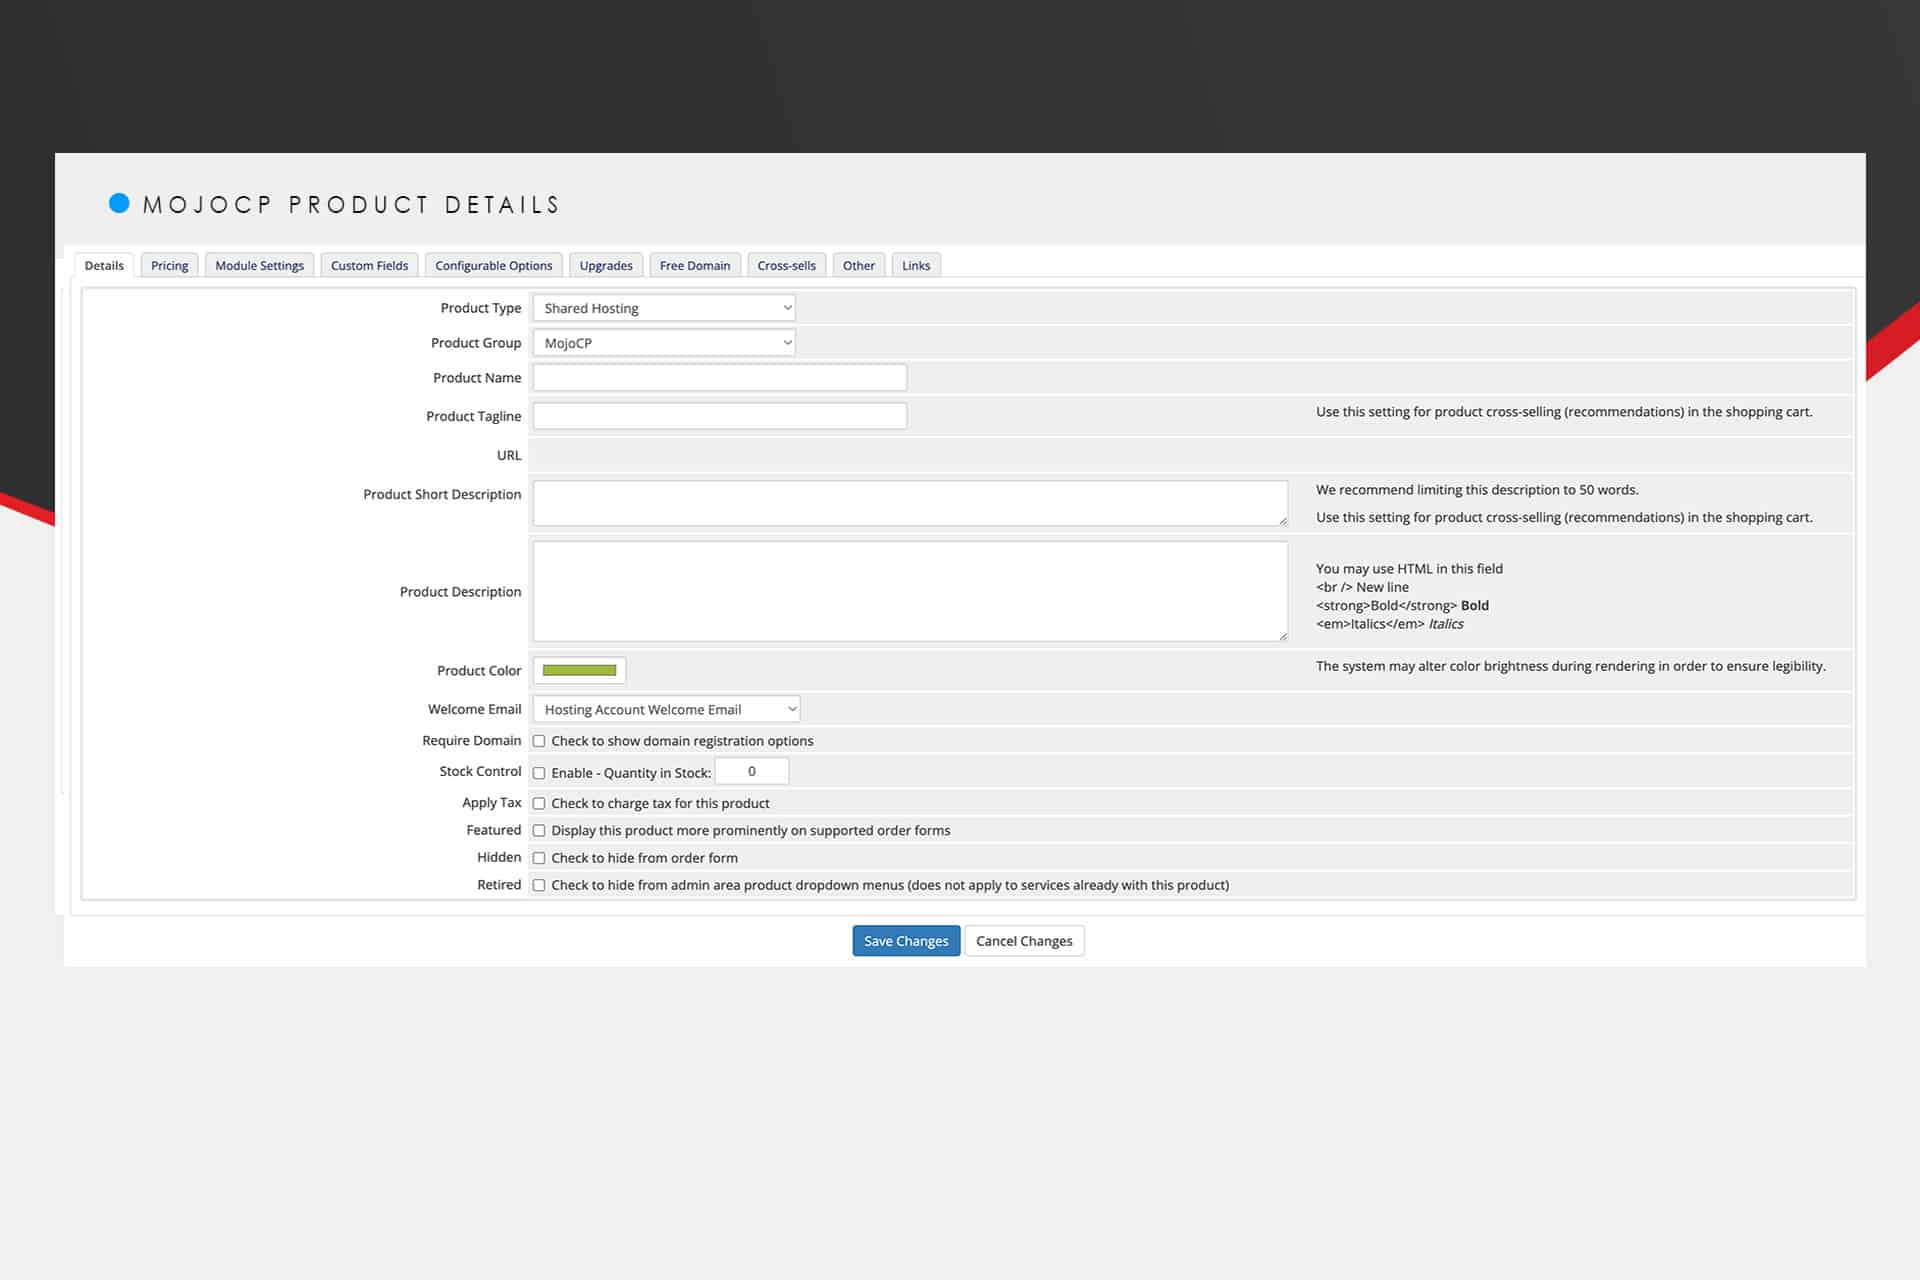
Product Details:
Configure a video streaming hosting product for your clients to purchase. Click () > System Settings > Products/Services or, prior to WHMCS 8.0, Setup > Products/Services > Products/Services
- Click “Create a New Group” and enter “MojoCP” in the Product Group Name field. Click “Create Group.”
- Back on the “Products/Services” page, click “Create a New Product.”
- On the “Add New Product” page, choose “Shared Hosting” as the product type.
- Choose “MojoCP” as the Product Group.
- Enter a name for the product in the Product Name field (e.g., “MojoCP stream package”).
- Enter a description for the product in the Product Description field.
- Select the welcome email that you want to send to your customers.
- Click “Save Changes” to apply the settings.
Configure Recurring Pricing:
From the WHMCS dashboard Click () > System Settings > Products/Services or, prior to WHMCS 8.0, Setup > Products/Services > Products/Services
- Select the product/service you want to configure recurring pricing for by clicking on its name.
- Click on the “Pricing” tab.
- In the “Recurring” section, configure the following options:
- Billing Cycle: Choose the frequency at which you want to charge your customers (e.g. monthly, yearly, etc.)
- Price: Enter the price you want to charge your customers for the selected billing cycle.
- Setup Fee: If you want to charge your customers a one-time setup fee, enter the amount here.
- Prorata Billing: Enable this option if you want to charge your customers a prorated amount for the remainder of the billing cycle when they first sign up.
- Once you have configured the recurring pricing options as desired, click the “Save Changes” button to apply the changes.
- That’s it! Your product/service will now be available for purchase with the recurring pricing you have configured.
"Please refer to the screenshot below for your reference:"
Creating an MojoCP Product:
You can create a product that provisions accounts on your MojoCP server at Configuration () > System Settings > Products/Services or, prior to WHMCS 8.0, Setup > Products/Services > Products/Services
Make certain to configure the following settings:
For Account template name, enter the MojoCP account template to use for this package. You can create account templates in MojoCP. (see) Service Plans. This allows you to predefine completely custom configurations for each video streaming package.
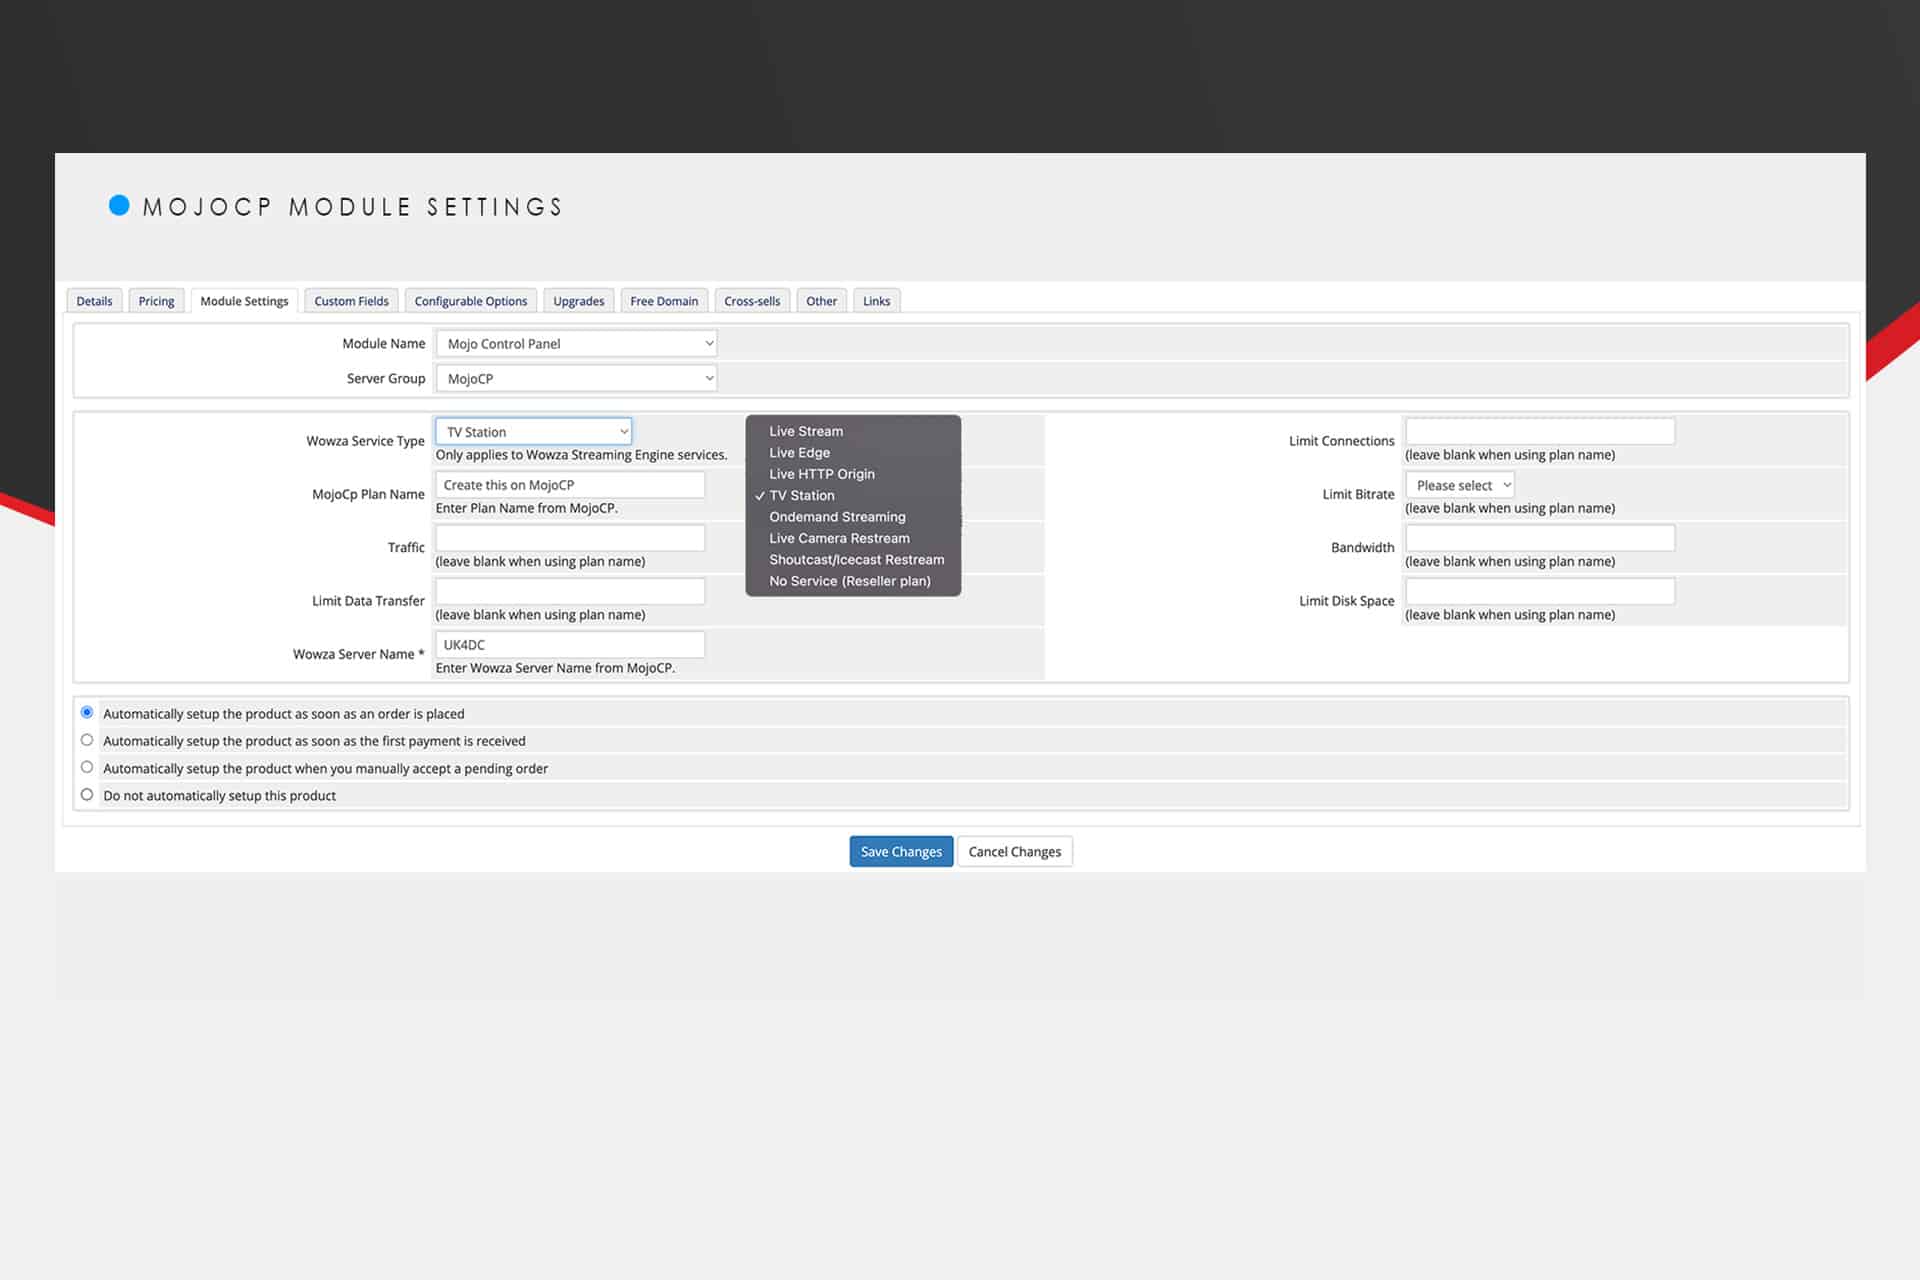
- Under the “Module Settings” section, select “Mojo Control Panel” from the “Module Name” drop-down menu.
- Under the “Server Group” section, select the “MojoCP” server group that you just created.
- Under the “Other Settings” section, select the appropriate “Wowza Service Type” from the drop-down menu.
- Enter the MojoCP Plan Name you created in the “MojoCP”.
- Leave the “Traffic” and “Limit Data Transfer” fields blank if you are using the plan name.
- Enter the Wowza Server Name from MojoCP in the “Wowza Server Name*” field. You can find this information under the Services Plan on MojoCP.
- Leave the “Limit Connections,” “Limit Bitrate,” “Bandwidth,” and “Limit Disk Space” fields blank if you are using the plan name.
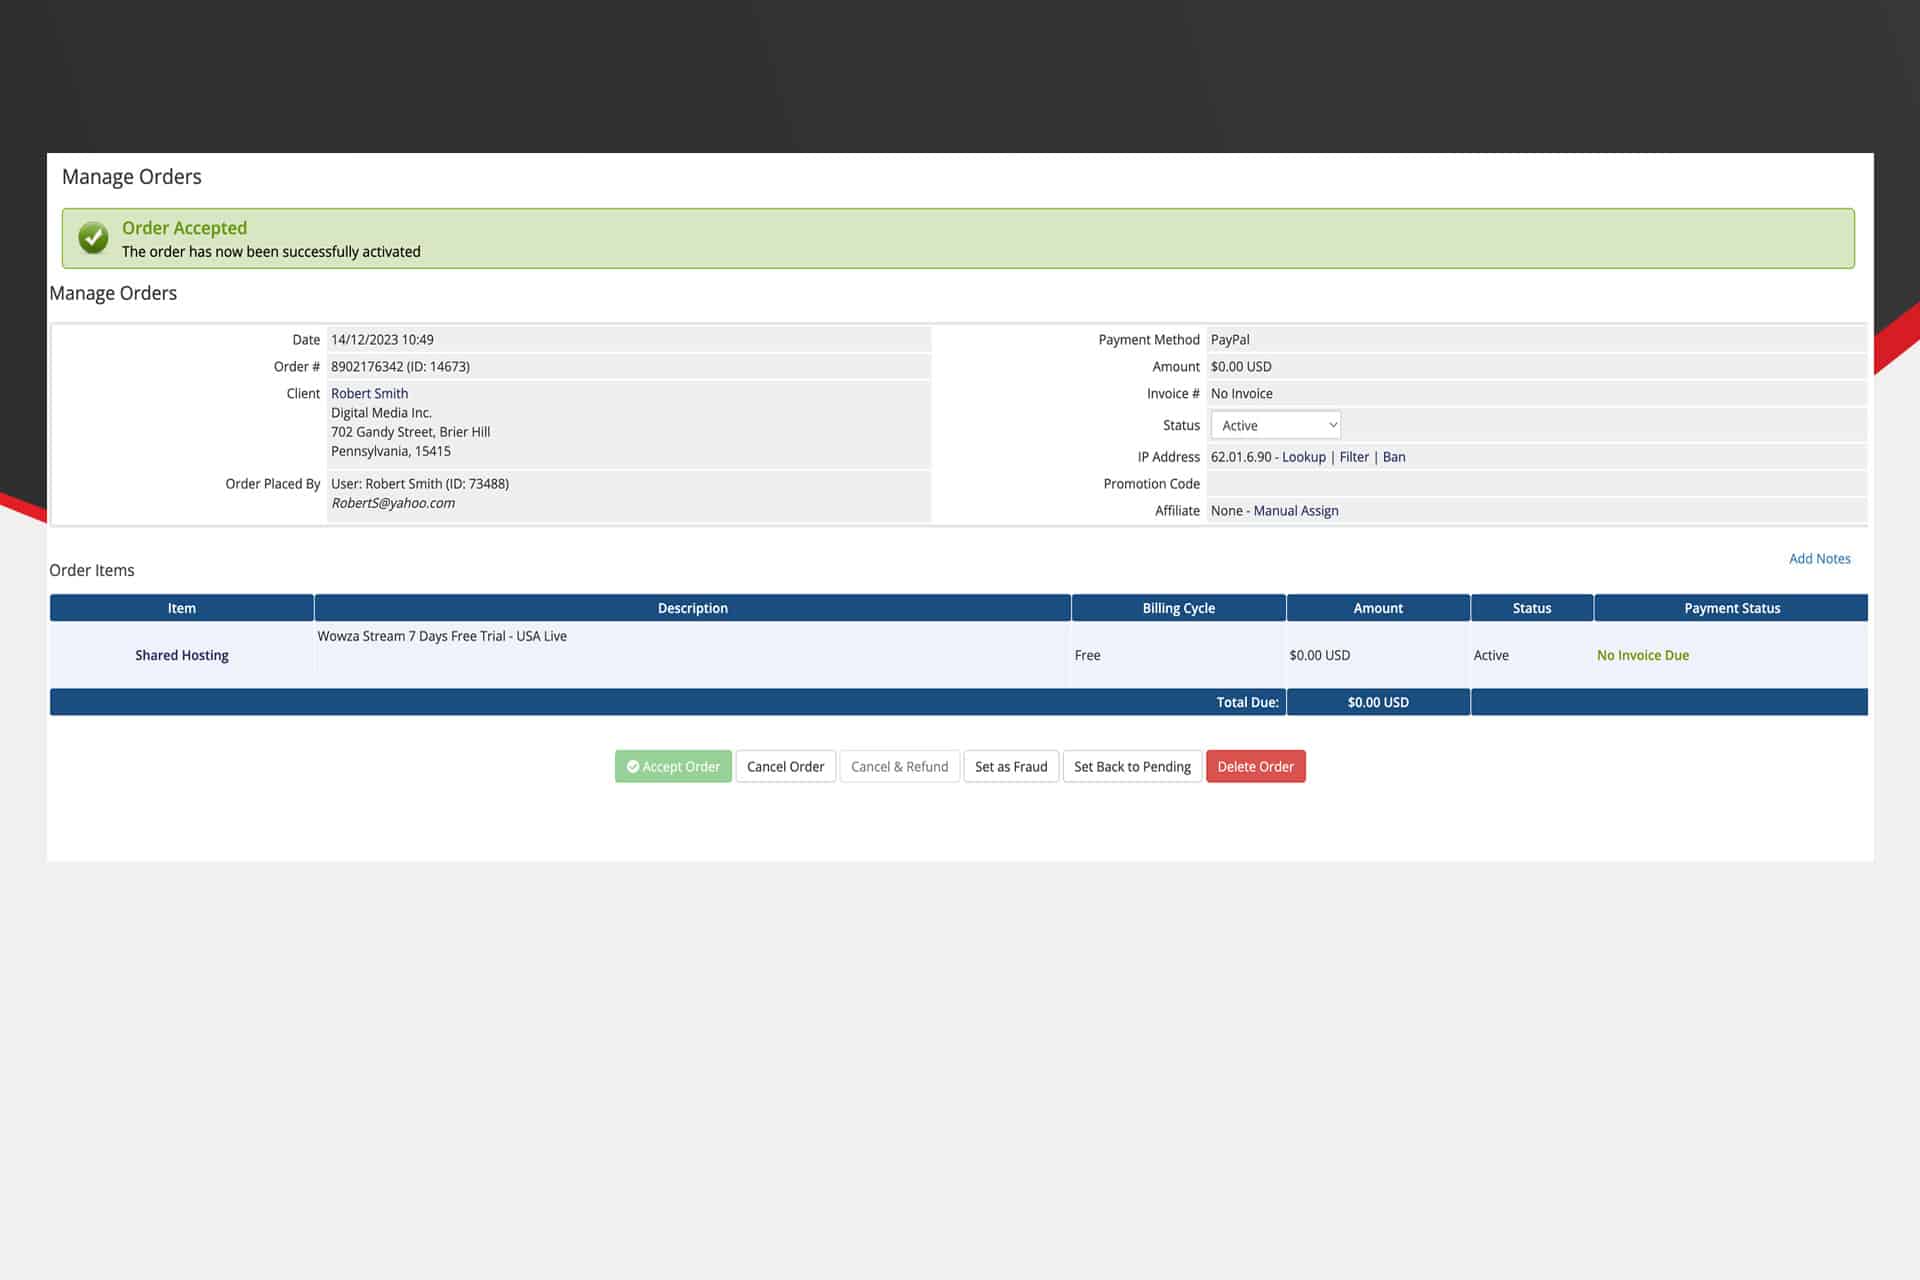
- Choose one of the “Automatic” options to setup the product.
- Click on the “Save Changes” button to apply the configuration changes.
That’s it! You have successfully configured the product service module for Mojocp
Method Standard:
You can create a product that provisions accounts on your MojoCP server at Configuration () > System Settings > Products/Services or, prior to WHMCS 8.0, Setup > Products/Services > Products/Services
To configure the Mojocp module for WHMCS without using the stream plan template, please follow these steps:
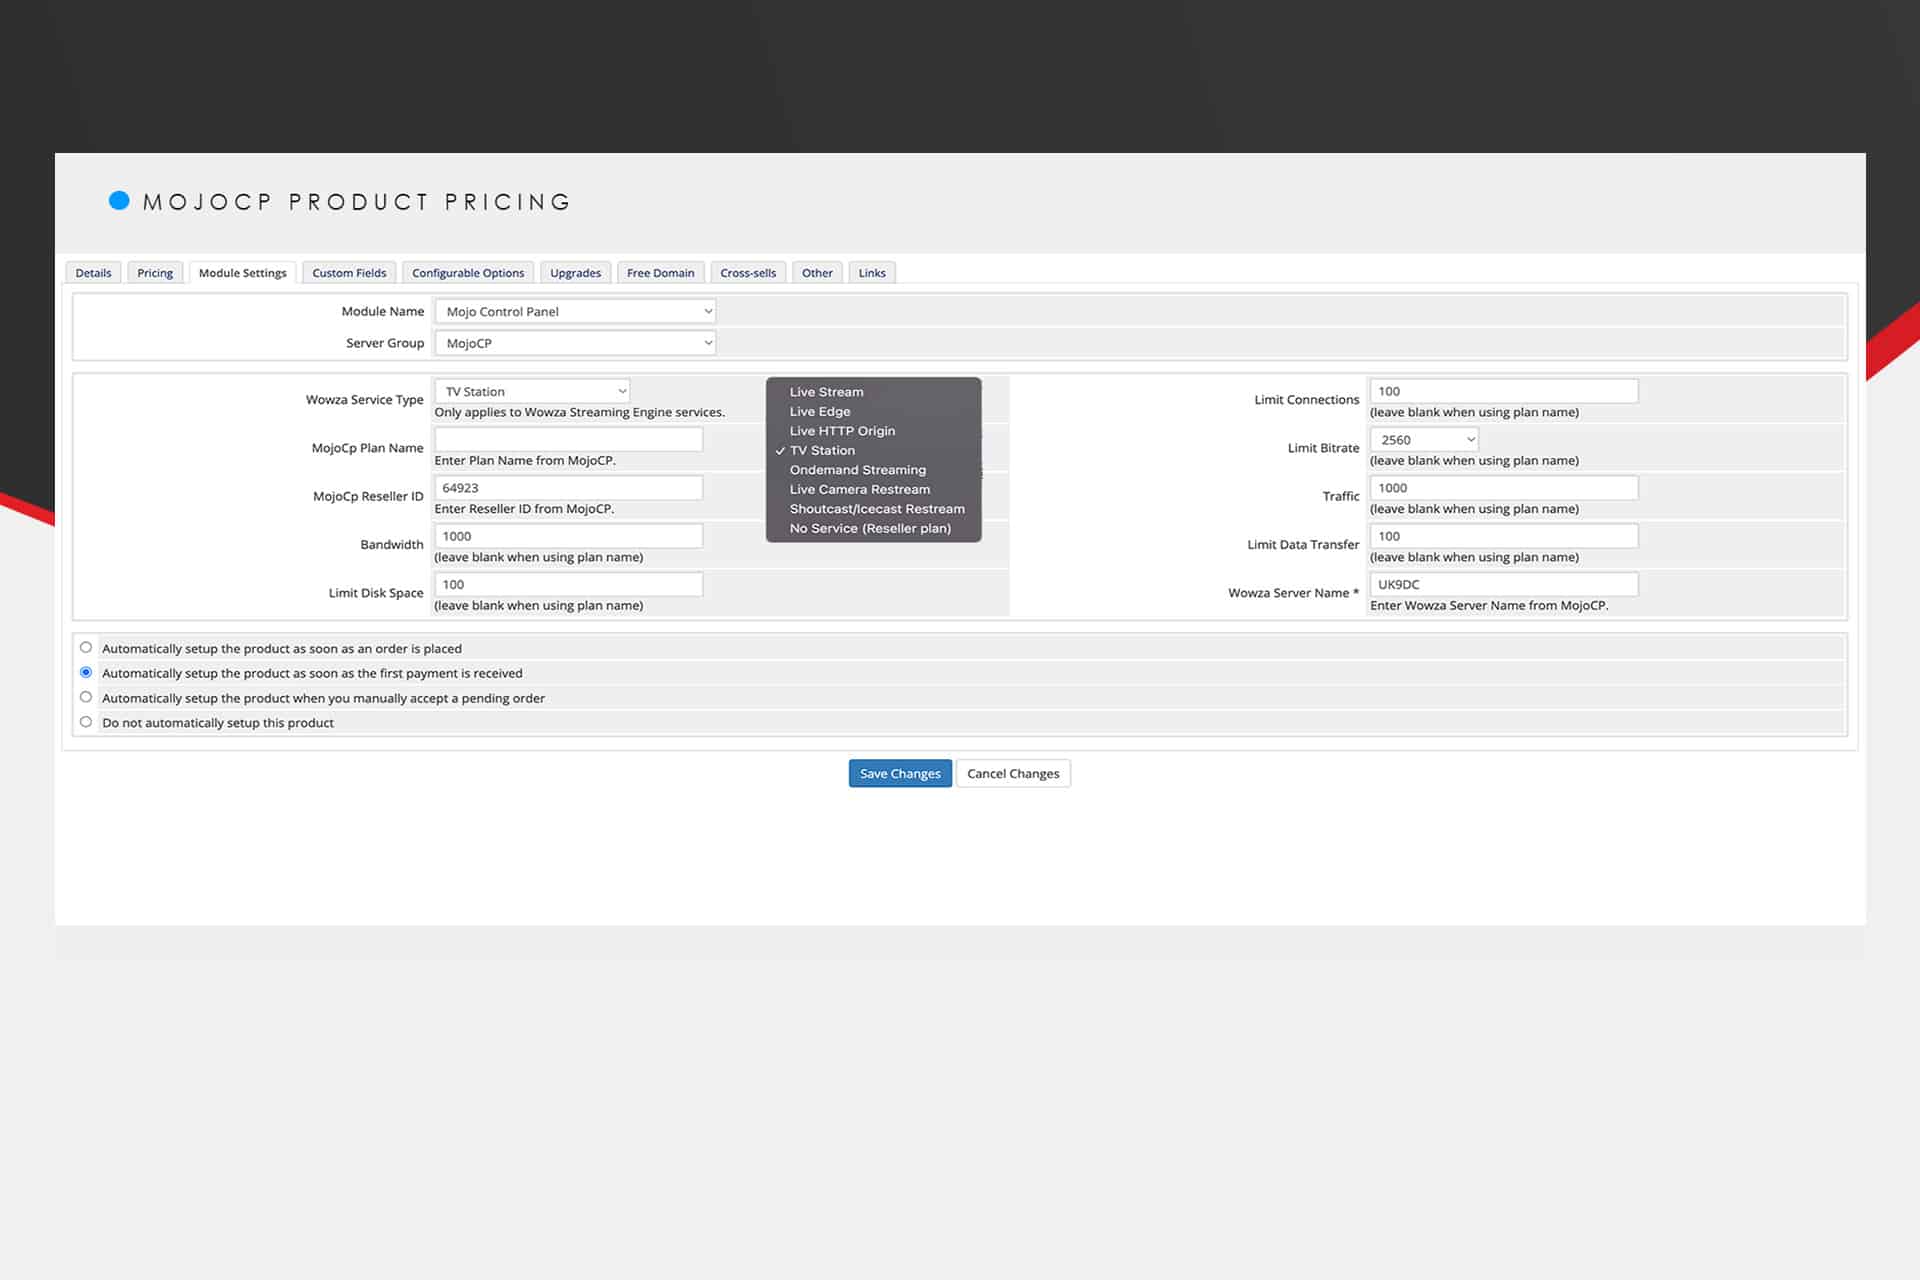
- Under the “Module Settings” section, select “Mojo Control Panel” from the “Module Name” drop-down menu.
- Under the “Server Group” section, select the “MojoCP” server group that you just created.
- Under the “Other Settings” section, select the appropriate “Wowza Service Type” from the drop-down menu.
- Leave the MojoCp Plan Name fields blank if you are not using the plan name.
- Enter your Reseller ID# in the “MojoCp Reseller ID#” field. You can find this information under your account settings(click on the avatar icon in the top right corner of the screen and select “Settings”).
- Specify the monthly data transfer limit, traffic, and bandwidth for this application. You may optionally enter 0 to specify unlimited, or leave this blank to use the value specified in the account template.
- Specify the maximum number of simultaneous viewers for this application. You may optionally leave this blank to use the value specified in the account template.
- Enter the Wowza Server Name from MojoCP in the “Wowza Server Name*” field. You can find this information under the Services Plan on MojoCP.
- Specify the limit disk space for this application. This only applies for TvStation and On-demand. For Live, enter a minimum of 50MB. You can optionally leave this blank to use the value specified in the account template.
- Choose one of the “Automatic” options to set up the product.
- Click on the “Save Changes” button to apply the configuration changes.
That’s it! Your product/service will now be available for purchase with the recurring pricing you have configured."Please refer to the screenshot below for your reference:"
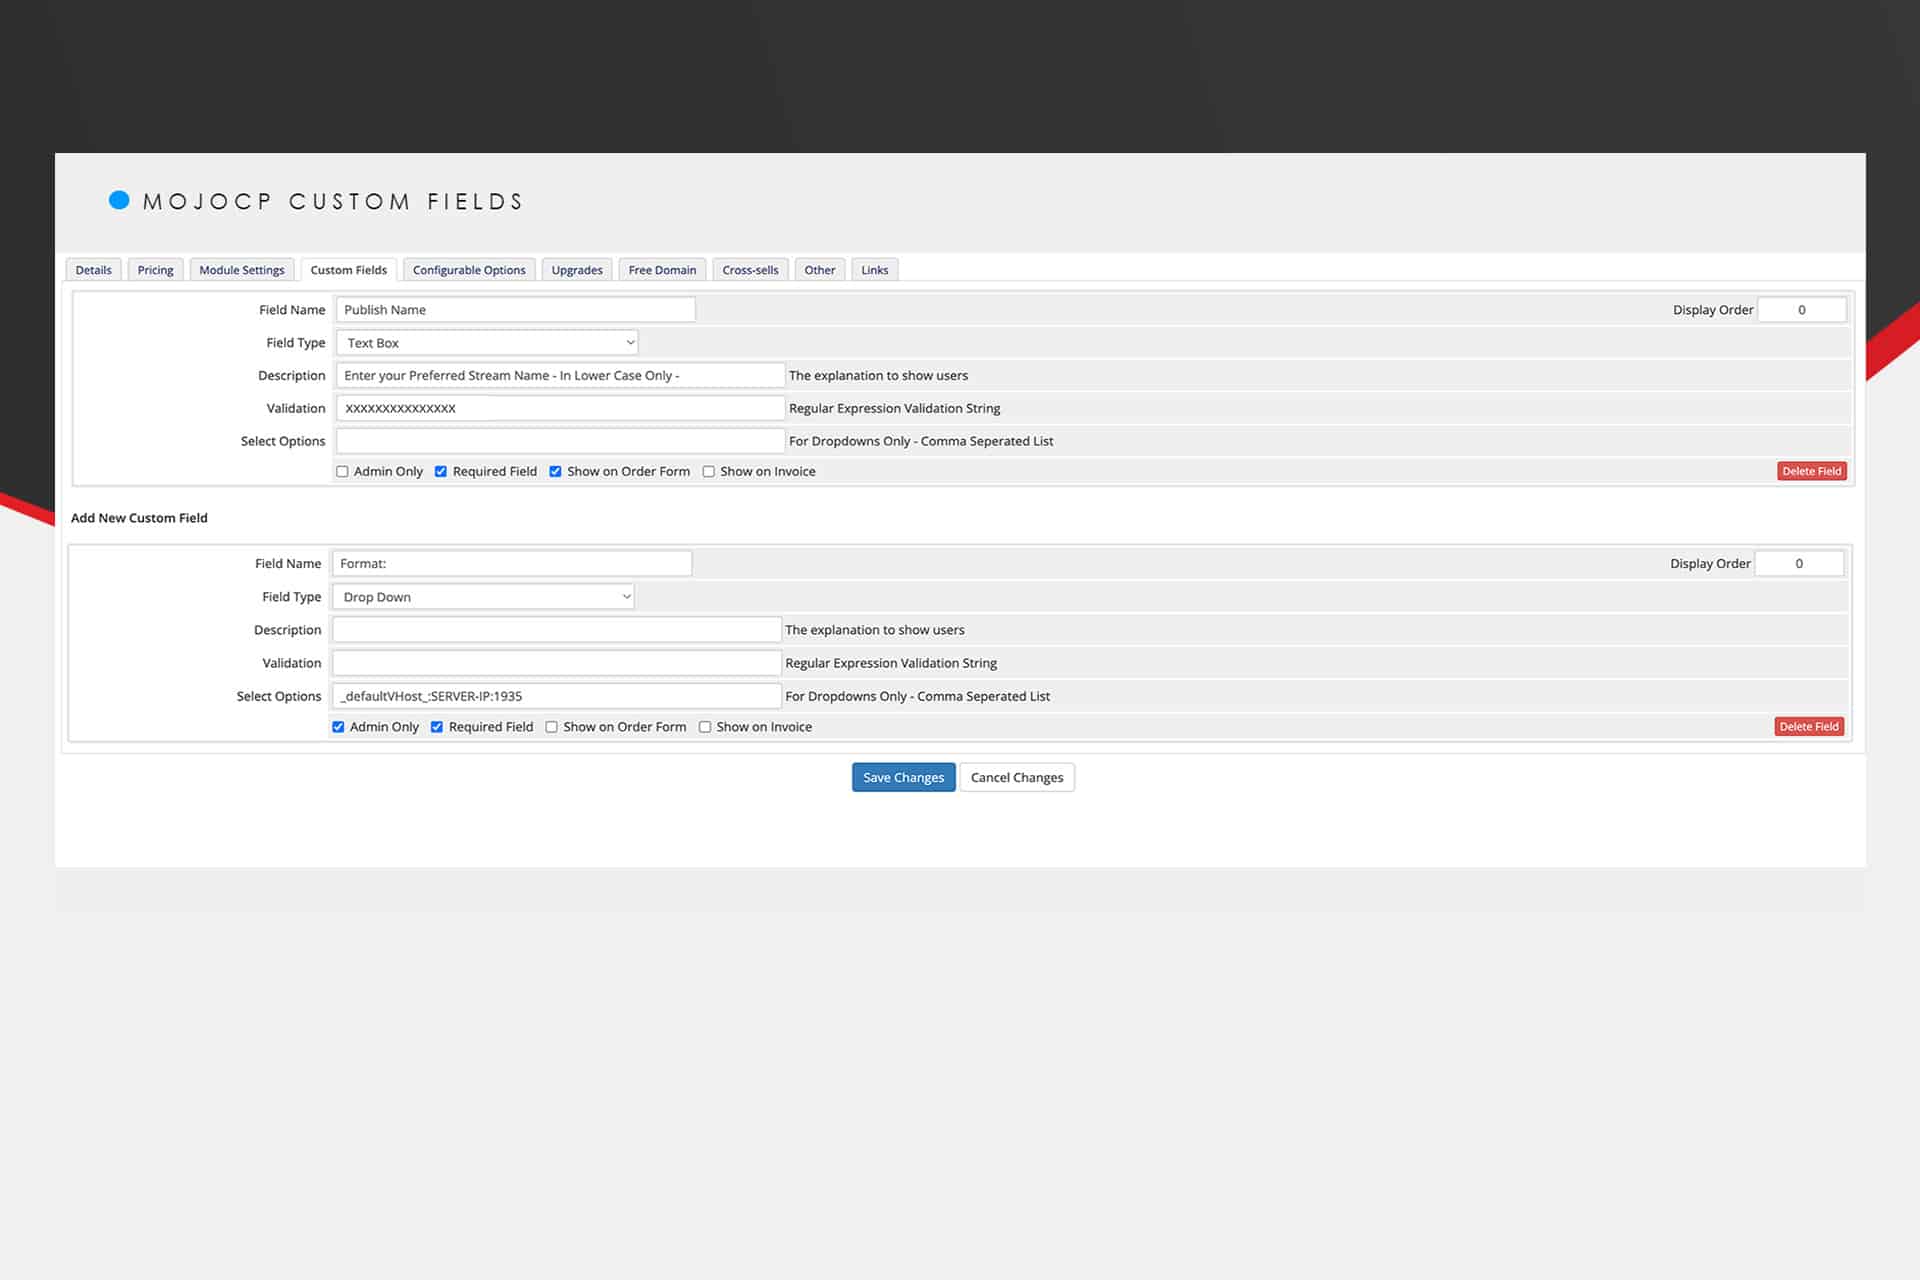
Custom Field Tab:
On the Custom Fields tab, under Add New Custom Field, enter the following:
Custom Field: Application Name:
- Field Name: Publish Name
- Field Type: Text Box
- Description: Enter the preferred Stream Name – In Lower Case Only
- Validation: xxxxxxxxxxxx
- Tick: Required Field.
- Tick: Show on Order Form.
Custom Field: Wowza Host:
- Field Name: Format
- Field Type: Drop Down
- Description: Leave Blank
- Validation: Leave Blank
- Select Option: _defaultVHost_:Server-IP:1935
- Tick: Admin Only
- Tick: Required Field
Failing to set these fields may prompt the client to fill them out on the order form, treating them as configurable options. Maintain the default settings for other options.
"Please refer to the screenshot below for your reference:"
MojoCP Module
The MojoCP module offers seamless integration with WHMCS, providing users with effortless control and oversight of MojoCP servers within the WHMCS environment. This module is designed to deliver comprehensive management functionalities for MojoCP servers directly through WHMCS.
Supported Features
The MojoCP module empowers the inclusion and administration of MojoCP servers within the WHMCS platform.
- Create, Suspend, Start, Restart.
- Unsuspend, Terminate.
- Change Password, Usage Updates.
- Client Zone Link.
User Reference:
Discover our extensive video tutorial, providing a comprehensive step-by-step guide on integrating the MojoCP module with your reseller account. Gain valuable insights into seamlessly incorporating the module, enabling efficient management of MojoCP servers within your reseller account.